
 by
by 
My homebrew practices have come a very long way. In fact, I never realized how meticulous the whole process really was until I got more experienced. Sure you can wing it and get some decent results, but controlling the process from soup to nuts is going to ensure better overall and more consistent results.
Early on I fell victim to beer starter kits that give overly generic advice such as “pitch your yeast below 80°F.” While this isn’t wrong advice, it’s certainly bad advice—especially if you want good results.
Why Control Fermentation Temperature?
Fermentation temperature control was probably the single factor that made the biggest incremental improvement in my homebrew. To put it simply, your typical ale yeast performs best in the 66-72°F range. This is the sweet spot for ensuring your yeast do their job without producing too many unwanted off-flavors. Yeast THRIVE in warmers temps—but they reproduce more rapidly and produce more esters in the process. We want to avoid this by pitching enough yeast and controlling the temperature.
Off-flavors often associated with uncontrolled fermentation temps:
- Fusel alcohols: Often perceived as a hot alcoholic taste that almost tastes boozy or vodka-like This tends to fade during conditioning.
- Esters: Often perceived as fruity, banana, pear, or nail polish remover. While some esters are desirable in certain styles like hefeweizens, they often hit you over the head when they aren’t supposed to be there. Esters can subside during conditioning, although excessive amounts may never improve with time.
- Acetaldehyde: Often perceived as green apples, raw pumpkin or squash, or Jolly Ranchers. Acetaldehyde is a natural byproduct of every fermentation however it can present itself in excessive amounts in uncontrolled conditions.
All of the off-flavors described above are completely natural and will occur in every fermentation to some degree. They are just not as detectable in ideal fermentation conditions.
Is My Basement Cool Enough?
Actively fermenting beer can be 10 degrees higher in the fermentation vessel than the ambient temperature of the room. So if your brewhouse or seemingly cool basement is 70°F your beer could be 80°F during active fermentation. This is the point of no return that is going to yield a lot of nasty esters that will even take over a clean ale yeast. The whole “my basement is about 68°F” school of thought is not always reliable, especially in the summer.
In my experience, I’ve found my stainless steel fermenter to maintain fermentation temps better, especially in cooler environments. Steel is much better than plastic or glass in terms of retaining cooler ambient air that has an insulating effect on your beer. Plastic and glass are inferior thermal conductors and feel warmer to the touch than steel at room temp.
For a more budget-friendly approach, you can wrap your fermenter in a cool water-soaked towel or even place your fermenter in a cool water bath. This is the most affordable solution but it’s not the most reliable or precise. If your space is too cold (such as a drafty basement in the winter), a space heater can be used to warm the fermenter as needed.
How to Precisely Control Fermentation Temp with a Fridge
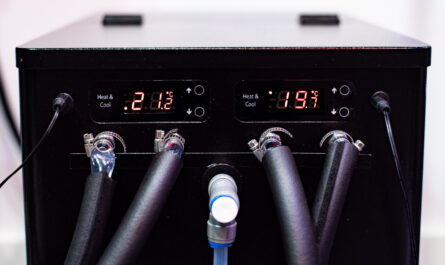
Many homebrewers use dedicated chest freezers or fridges as fermentation chambers. This is the best way to efficiently control fermentation temp outside of a glycol chiller. The only downside is cost, size, and space concerns. Fridges obviously take up a lot of space and a mini-fridge may not always be large enough for your fermenter. I use a small fridge now as I ferment in corny kegs but I also have the Anvil Bucket and Cooling System, which works really great for temp control.

The most precise way to control your fridge/fermenter’s internal temperature is to use an Inkbird controller. An Inkbird controller comes equipped with a sensitive digital thermometer that can be programmed to toggle a refrigeration or heating source on/off. By plugging in your chest freezer or fridge into the Inkbird, you can easily maintain an exact environment in a fridge for instance. Ideally, the temperature probe is inserted into a thermowell that sits inside the fermenter.
An Inkbird is what enables homebrewers to use a deep freezer to maintain warmer fermentation temps without any other modifications. Inkbirds can also be used to turn on cooling pumps as seen in the Anvil Cooling System or the Ss Brewtech FTSs.
Ideal Pitching Temp?
I will say I noticed a significant improvement in my beer when I started pitching at cooler temps alone. If you pitch your yeast around 66-68°F, you’ll at least take a step in the right direction by giving your beer a fighting chance, assuming you’re fermenting in a relatively cool environment and not a 90-degree garage in July. Your fermenter may warm up during fermentation, but at least you’re starting low enough to account for a temp increase.
While this approach will help clean up your beer, I still recommend a precise way to control fermentation temp so you aren’t leaving your results up to chance.
Keeping Your Fermenter Warm
Fermenting too cool can equally stress yeast and cause unexpected results. A lot of expensive conical fermenters can be accessorized with heating pads for those fermenting in cooler conditions or who wish to ferment warmer than ambient. Heaters ensure your beer does not fall below your target fermentation temp or cause your yeast to go dormant in a very cool environment.
For heating, I use a FermWrap heater taped to the outside of my fermenting keg. It fits perfectly and wraps around the majority of the keg. Just be sure to position any temp probes or thermometer strips where the heater doesn’t overlap. You’ll want to position the heater as low as possible on the fermenter because the bottom is always going to be the coldest part of the fermenter. These units are affordable but won’t reach all the way around a bucket or carboy. Regardless, I think they’re still effective.
Many brewers will let their fermenter temperature rise slightly (72-74°F) towards the end of fermentation to ensure full attenuation (ensuring the yeast consume all the sugars they possibly can) and to minimize detectable diacetyl (buttery flavor).
As mentioned, yeast is happiest at warmer temps and actually do their job better at warmer temps, it just doesn’t always yield the results brewers are looking for to produce the best beer.

Ok so I’m a bit late on this and for that I apologize. I’ve only been brewing for just under 3 years now and I’ve had some pretty decent batches and I literally dumped a colossal failure about an hour ago. That one in particular was brewed before I found your article about 6 home brewing tips. Since then I’ve gotten a bit obsessive about figuring out why some brews are ok and some are just crap. I can’t justify a fancy glycol chiller and don’t have the patience for retrofitting an old fridge or freezer so I went the water bath and ice bottles route. I put a high gravity (1068) brew in the ice bath 4 days ago. I also have a simple amber (1044) that I brewed 6 days ago, no cooling. Neither is properly drinkable yet by a long shot but I tasted both a bit ago. The non heat lower gravity was fairly harsh but I figured some of that will mellow out once I get it in bottles in a couple weeks. Sampled the cooled higher gravity one and my very first reaction was “WOW!” Nowhere close to ready, but considerably smoother than the non cooled.
I say all this to say simply, Thank you! Your articles and opinions are very much appreciated over here.