
 by
by Fermenting in a corny keg has been a game-changer in terms of my homebrew in both beer quality and my overall process. If you already have a kegging system, then you can reap some of the major benefits of a pressure-rated conical at a fraction of the cost. There’s something so simple about the process that I absolutely love. Maybe it’s the fact that I’m so accustomed to cleaning and sanitizing kegs and keg parts that it feels like second nature.
I will say the process of doing a closed transfer from fermenting keg to serving keg has never been easier. I can’t say I’ve had the same success with my bucket fermenter. I think this is largely due to my inability to cold crash my bucket fermenter because it’s too large for any fridge. This makes transfers much more susceptible to clogs. The pressure-rated capability of kegs also makes moving beer a lot easier than relying on gravity.
As a quick note, I use ball lock kegs, so all of my suggestions below are geared towards ball lock kegs and fittings. You can of course do the same thing with pin lock kegs and their respective fittings. Assuming you’re using a 5-gallon keg, you will need to scale your batch size back to 4.5 gallons to accommodate the size of the vessel and the necessary headspace required for fermentation.
Why Use a Cornelius Keg as a Fermentation Vessel
- Kegs are easy to use and easy to clean
- Great for pressure transfers from serving keg to fermenting keg
- Have the option to ferment, crash, and serve in the same vessel (best for quickly consumed kegs)
- Kegs are pressure-rated higher than most true conicals/unitanks available to homebrewers
- Easily cold crash in a totally sealed vessel with no risk of oxygen suckback
- You can naturally carbonate with a spunding valve on the tail end of fermentation
- Carbonate as you cold crash
Why Ferment Under Pressure?
Corny kegs give the homebrewer the ability to ferment under pressure. Fermenting under pressure is valuable for some beer styles because it decreases ester production and allows you to ferment at higher temps without the off-flavors that accompany it. This is especially useful if temperature control is not an option for you.
Prepping Your Keg
Cut corny keg dip tube 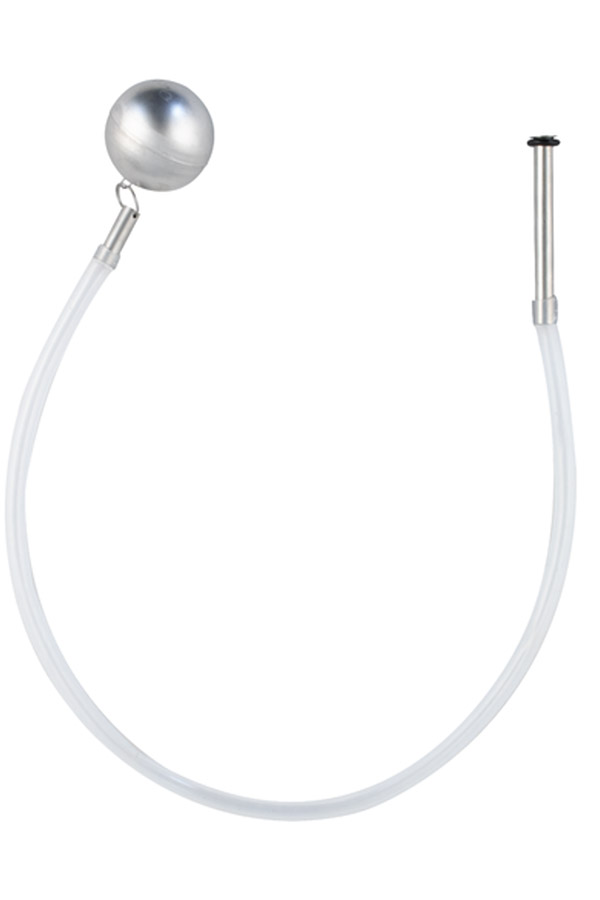
Floating dip tube
To no surprise, the liquid dip tube must be either bent or cut so it sits further off the bottom of the keg so you don’t suck up any trub transferring your beer out of the fermenter. The styles of beer you typically brew will dictate the liquid tube length.
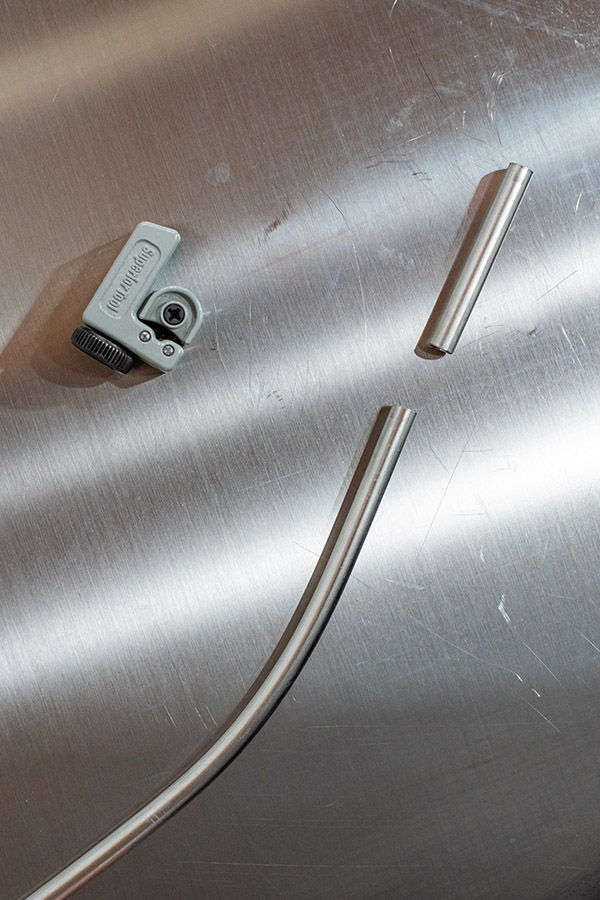
Cutting the Dip Tube
I mainly brew hoppy beers with massive dry hop additions so I opted for removing just under 2.5 inches off my curved dip tube. This gives me a little under .5 gallons of dead space at the bottom of the keg. A straight dip tube may need more or less so keep that in mind. My recommendation is to cut a little at a time and test it so you don’t do too much. To cut the tube, you’ll need a small metal tube cutter. They’re easy to use and make a clean cut without burrs. My cutter is meant for brass and aluminum but it still worked.
Floating Dip Tubes
The other option is to swap out your standard dip tube for a floating dip tube. A floating dip tube fits into your keg’s liquid post but uses flexible tubing and a float ball to keep the dip tube end at the very top of the liquid level. This is probably the most risk-averse method and also keeps your keg’s stainless dip tubes intact in case you need to use it for dispensing beer later on. Floating dip tubes are pretty cheap and work exceptionally well (my preferred method). This would be best for varying batches with different trub levels. They also are great for dispensing clear beer in general.
Pressure Release/Blowoff Tube

Blow off tube 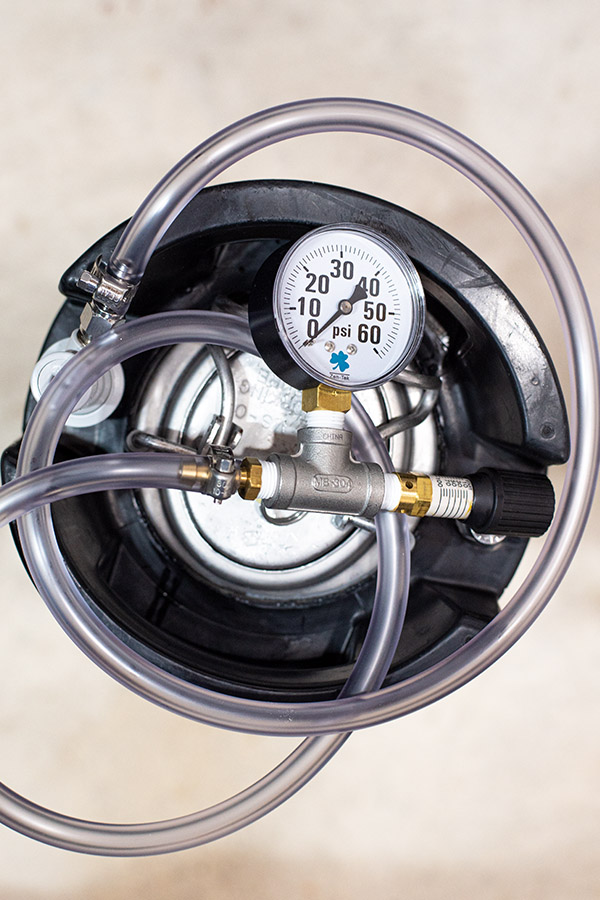
Spunding valve
In terms of pressure release during fermentation, you have a few options. The simplest method is to use a blowoff tube submerged in Star San solution. I made my own using a gas quick disconnect equipped with a hose (don’t forget the swivel barb for 5/16 ID tubing). The other option is to use a spunding valve and leave it FULLY OPEN unless you’re using it to regulate pressure while fermenting under pressure. I built my own spunding valve using this link from Homebrew Finds. I opted for the tube version #3 with brass barb since my fermenting fridge has low clearance. Traditional spunding vales directly clip onto the gas post and add several inches of height.
Fermentation will generate A LOT of pressure. Don’t ever ferment in a totally sealed keg or you could potentially create a dangerous situation.
Temp Control
Kegs obviously don’t come with any form of integrated cooling system so a fridge is really the only option for maintaining fermentation temp. I tape an Inkbird probe securely to the outside of the middle of the keg and place the keg in my fermenting fridge. I use an old T-shirt and tie it tightly around the keg, covering the probe, so the ambient fridge temp will have less of an impact on the temp reading.
I’m sure there is a more sophisticated method of doing this but it seems to work pretty well at maintaining consistent temps. I’ve been using a Tilt hydrometer in my kegs to monitor specific gravity and temperature. I can confirm they work in a pressurized keg and also proved that the internal temp of the keg was within 2-3 degrees that my Inkbird probe reported from the side of the fermenter.
For heating, I use a FermWrap heater taped to the outside of the keg. It fits perfectly and wraps around the majority of the keg. Just be sure to position the temp probe where the heater doesn’t reach. You’ll want to position the heater as low as possible on the keg because the bottom is always going to be the coldest part of the keg. The FermWrap heater will heat quickly and can easily get the keg up to 80°F+.
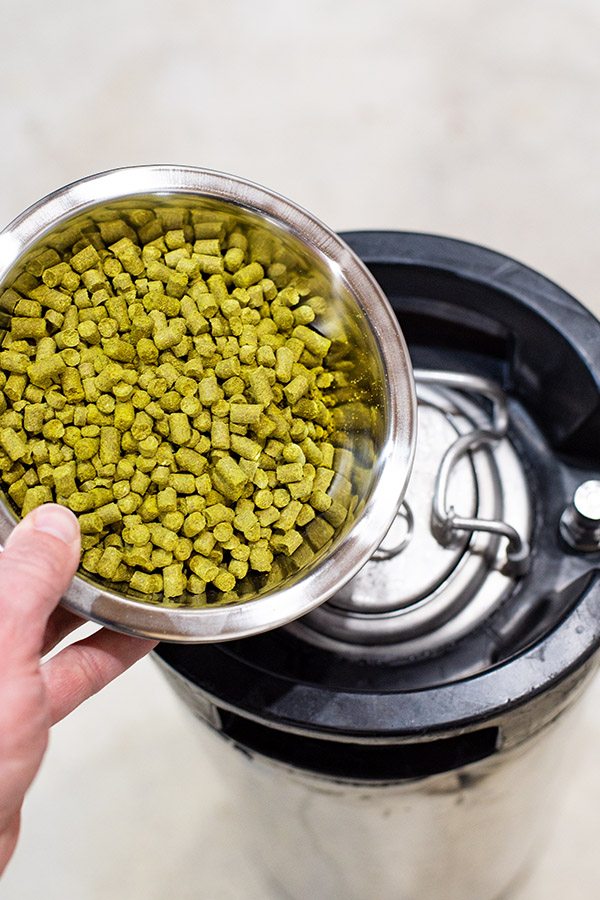
Dry Hopping
One of the biggest drawbacks with keg fermenting is of course the lack of options to add hops in a no-oxygen closed system (like a hope doser). Of course, this is the same story for most basic fermenters. Conicals can be equipped with contraptions to easily add hops and eliminate oxygen exposure. That being said, if you work quickly, I think your risk of oxygen exposure is incredibly low, especially if you purge the headspace in the keg with CO2 immediately after adding the hops and closing the lid.
Alternatively, you can hook up your CO2 and purge the keg with 3-4 PSI WHILE you’re adding your dry hops. This will fill the headspace with CO2 and prevent oxygen from getting in.
The last option is to transfer your beer to another fully purged keg reserved for dry hopping. This would entail adding your hops to a sealed and purged vessel and racking your beer to the new keg when it comes time to dry hop. My only hesitation with this method is having to potentially modify two kegs to avoid sucking up hops. In this instance, you would most likely need a method to contain the hops or use additional floating dip tubes.
Dry Hopping Under Pressure
My latest practice with NEIPAs is to dry hop under pressure in an effort to lock in as much of the volatile aromas as possible. Once I reach terminal gravity, I swap out the blowoff tube for the spunding valve and set it to 10 PSI. If you do this in conjunction with a dry hop addition you will also be able to naturally capture the pressure build-up as CO2 production will be retriggered by the yeast interacting with the hops. If you don’t reach 10 PSI in 3-5 hours, you can top it off with CO2 and let it sit.
My latest dry hop experiment was an 8-ounce charge in a 4-gallon batch. I did not have any issue with clogging during transfers. You can hop in a stainless hop tube or mesh bag but you’re not going to get the best dry hopping effect. If you cold crash adequately, you shouldn’t have any issues. Scott Janish writes about keg hopping in-depth on his blog and has some other creative options.
Pulling Samples
A simple picnic tap is the best way to easily pull samples during fermentation for testing specific gravity or tasting. This is a great option as it doesn’t risk oxidation. Do not open the keg lid unless you absolutely have to. It’s not worth exposing your beer to oxygen. Be sure to fully sanitize anything that comes in contact with your keg or beer.
These also come in handy for doing an initial runoff of cloudy/trub beer. This is helpful for ensuring your beer is clear before making any major transfers. You will inevitably suck up a little trub when you first rack.

Cold Crashing
Cold crashing has never been easier as you can simply throw your keg in your fridge/keezer and crash your beer before transferring to the serving vessel. The best part about keg fermenting is you don’t have to manage oxygen suck-back since you have a fully sealed pressure rated vessel. At this stage, you don’t need any airlocks, blowoffs, spunding valves etc.
Always cold crash for 24-48 hours at 33-35°F to settle anything left in suspension. You don’t want large hop particles to clog your lines.
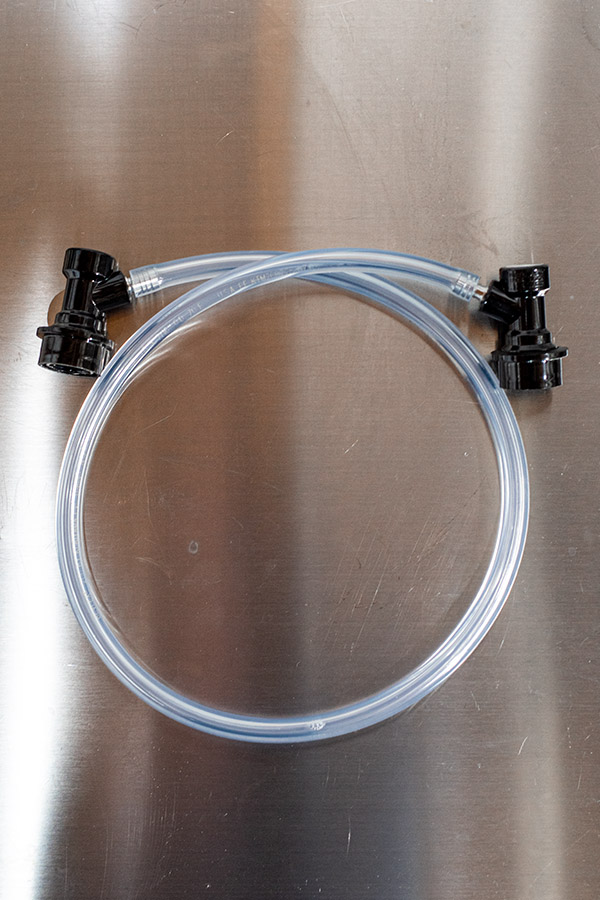
Transferring Beer
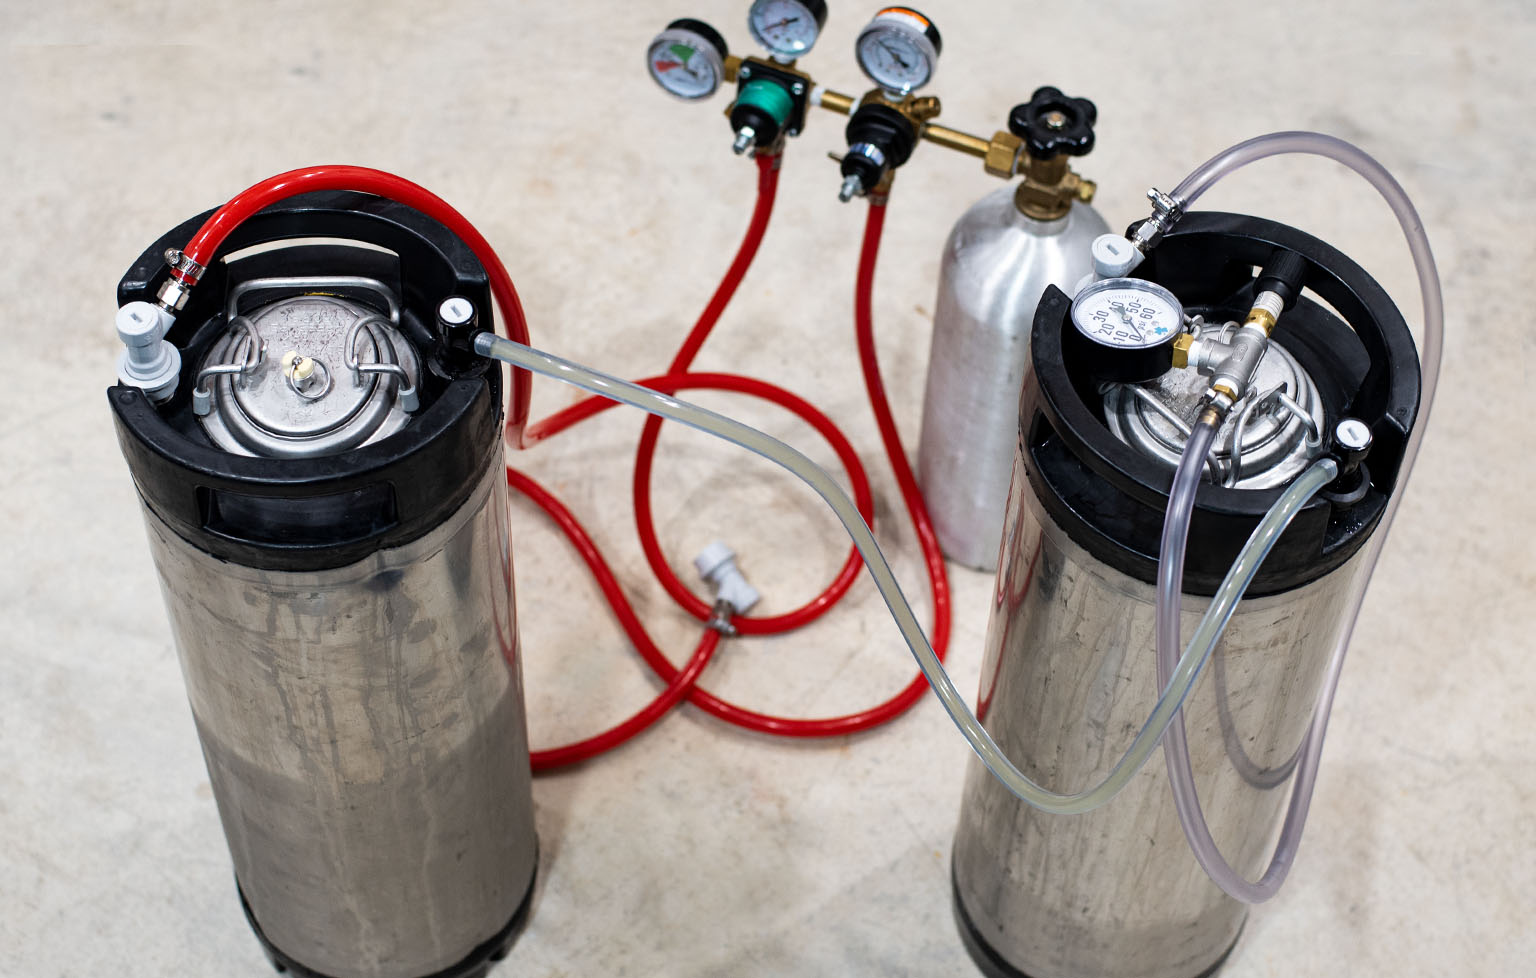
Transferring from fermenting keg to serving keg is really easy using a jumper line. This is a piece of tubing with a liquid quick disconnect on each end. This allows you to transfer beer OUT from the liquid tube in your fermenting keg into the liquid OUT of your serving keg. If you build your own jumper (which I suggest you do), I would highly recommend you buy liquid disconnects with removable flare barbs for easier dissembling and cleaning. You will need standard 3/16 ID beer lines for this.
Steps to Transfer:
- Fully purge your serving keg using the Star San/water flush method. Clean and sanitize the serving keg and fill it to the top with Star San water solution.
- Connect your CO2 tank to the serving keg and push all the water out through a liquid line. This will leave you with a fully oxygen-purged keg. This is also a great opportunity to flush your kegerator’s beer lines with sanitized water.
- Add 3–5 PSI to both the fermenting and serving keg (from what I’ve read equalizing keg pressure will help with foam when transferring carbonated beer)
- Connect your CO2 tank to the fermenting keg with the regulator set to the same 3-5 PSI you initially filled each keg with.
- Attach the jumper line to each beer “OUT” post on the kegs.
- Vent the pressure from the serving keg to start the flow. CO2 will flow out of the serving keg as it slowly fills with beer. I use my spunding valve set to 0-1 PSI on the gas post of the serving keg. You can also just attach a naked gas post to vent or put the PRV in the open position. If beer flow is slow or not moving, increase pressure a few PSI on the fermenting keg.
- Disconnect the gas/jumper line once the flow stops and you’re ready to carbonate/serve.
PSA: If you beer has been carbonating or is carbonated at this point, You’ll want to be sure not to transfer too quickly. Stick with a slow 3-5 PSI transfer to prevent foaming.
All-in One Fermenting and Dispensing
A lot of homebrewers are fermenting and serving out of the same keg. This is an incredibly appealing option as it eliminates transferring and oxygen exposure to the highest degree. If I went through beer faster, I would absolutely go this route. The only drawback is leaving your beer exposed to the trub for several weeks. If I was brewing a batch I knew I would finish in a matter of days or weeks, then this would be the ONLY way to go. I’d be hesitant to do this for a month or two…but I’m sure you could squeeze by.
Drawbacks
With all the benefits of fermenting in a corny keg, at the end of the day, a keg is a keg and does not have some of the advanced features of a true conical such as trub dumping or integrated temp control systems. Assuming you’re using a 5-gallon keg, you’ll also have to scale your batches back to about 4.5 gallons to accommodate the keg size and necessary headspace needed for fermentation. This is not a big deal for me as I lean towards smaller batches anyway.
Take good consideration when cutting your dip tube or go with a floating dip tube to reduce the risk of clogging your system with hops. A cold crash is going to really help prevent this.
Overall, I love keg fermenting and I think it’s a really efficient way to create a fully closed cold side process of your homebrewing on a reasonable budget. If you’re brewing delicate styles like NEIPAs, this process will be well worth your time and investment.


Great write up and a solid explanation of the process and it’s benefits. I’ve been fermenting in kegs for years now and what you describe has been (pretty much) my exact experience. I hope you don’t mind me adding a few comments to supplement what you have here:
– Fermenting under pressure – For no particular reason, I’ve just never done this before. I have a spunding valve on the way though so I’ll likely try it soon. In your experience, what styles benefit most from limiting the esters?
– Cutting the liquid line – I cut mine minimally, about an inch. I do get 3-4 ounces of trub in a glass before I transfer to the serving keg (using a picnic tap) but I dump it and then pull my final gravity sample. I’ve also recently ordered some floating dip tubes to try them as an alternative.
– Temp Control – You mention taping the temp probe to the outside of the keg but you didn’t mention insulating it. I use a short length bungee cord around my keg so I can slide my temp probe in and out if I need to move the keg for some reason. I also take a paper towel and fold it several times and slip it on top of the probe but under the bungee to provide some insulation on the outside of the probe. It’s a small suggestion but thought you might find those options helpful.
– Dry hopping – After a few particularly frustrating clogged transfers, I only dry hop in a mesh tube. You’re right that it’s not ideal and I’m searching for a fabricator to make me a hopping tube that is almost the full height of the keg so my hops have more room to float. That may not be necessary once I switch to the coating dip tube. At that point, I can toss them in freely.
– Transfer – In step 3 of your transfer description, you mention adding 3-5 psi of pressure to each keg and I’m curious why? After transferring out my sanitizer, I just open the serving/receiving keg’s PRV and start transferring in. Is there some improvement that I’m missing? Also, for others considering keg fermentation, I’d add that you can use that transferred out sanitizer to clean your beer lines (great suggestion BTW) but you can also reuse it for other purposes. I will often do multiple fermenting keg to serving keg transfers on the same day using the same 5 gallons of sanitizer. I also have a Blichmann QuickCarb that gets cleaned using that same sanitizer before I start carbing those newly transferred beers.
Finally, I’d add one more tip that you and others might find useful. If you’re keg fermenting, you can skip the use of wort chillers altogether. For the years I’ve been keg fermenting, I’ve never once sanitized my fermenting keg or chilled the wort before it goes in. I use the temperature of the wort to do the sanitizing. The keg is clean, of course, when the wort is transferred in but it’s not sanitized. I suppose if you wanted, you could spray the interior with some sanitizer in a spray bottle but it’s not necessary. I simply transfer the super hot wort directly in, seal it up, give it a light shake so the hot wort sloshes around all of the inside (including the underside of the lid) and that heat temporarily knocks back any bacteria.
For cooling the wort, I’ve gone two routes. I’ve put it straight into my fermentation freezer at my target fermentation temp overnight (without attaching the probe to the hot keg) and then pitched my yeast in the morning after it’s cooled (I then attach my probe). That works great. Alternatively, I’ve put the sealed, super hot keg in a large body of water to perform the heat transfer for me. I have a pool so I can just put the keg a few steps into the water and let it sit for an hour while I have a beer and clean up. If I’m at a friend’s house or don’t want to haul it to the pool, I’ve put the hot keg in a large (clean) trash bin full of cold hose water and I’ve also put it in my deep garage sink full of cold tap water. Since the keg is fully sealed, all those scenarios work great as long as you pitch a proper level of yeast within a day or two. It’s really just leveraging the fact that kegs are stainless, portable, heat tolerant, and sealed. Just thought I’d offer up another reason keg fermenting is so great!
Hey Adam – goood points here. I actually added a few things to address some of your notes. In terms of fermenting under pressure – I may not be the best person to answer that. I think it could be useful for fermetning lagers warmer or even with a super clean ale. Overall, it allows you to ferment warmer without ester production. It’s not something I have a lot of experience with at the moment. I know IPAs (which I brew mostly) do not benefit from pressure fermenting.
I have only dry hopped under pressure on the tail end of fermentation. I think this is also key to helping the hops to sink to the bottom. In regards to the 3-5 PSI in each keg, I think it helps to create equilibrium so you don’t fill the kegs too quickly. I’ve read this helps with foaming when transferring carbonated beer. Since I DH under pressure, and crash hooked up to C02, my beers tend to be slightly carbonated by the time I transfer to my serving keg.
Great article Shawn! I’m currently using an Anvil fermenter, and while it works great for my basic fermentation needs, it lacks a few things when it comes to pressure transfers. I’ve recently started using the natural CO2 produced during fermentation to purge my serving keg, because I’m cheap and don’t want to waste my bottled CO2. I’ve had to rig up a sort of system to do this with my Anvil, and while it works for the most part, it always seems to create a few minor problems. In addition, doing pressure transfers with my Anvil also created the need to rig something special up, and while not ideal does seem to work for the most part.
Given these challenges, I was looking at Spike’s Flex line of fermenters, which has all the attachments to add pressure and would simplify the overall process. Unfortunately, as I started looking into this, I quickly realized I would need to upgrade the freezer I’m using as my fermentation chamber since the Flex wasn’t going to fit in my current setup.
Long story short, I came across an article less than a month ago about using Corny Kegs to ferment, and that really got me thinking. Why in the world was I looking at spending 100’s of dollars to upgrade my equipment, when I already had everything I needed. I normally brew smaller batches, and using one of my existing kegs as a fermenter would cover everything I needed it to do in a much simpler manner than what I was currently using. I cut the dip tube on one of my existing kegs, sanitized it, and now it’s just waiting to be put to use.
After all of that, I do have one question. I was originally planning to continue using my Anvil for my 4.5 and 5.5 gallon batches, and using the keg fermenter for my smaller batches. My next brew is going to be a 4.5 gallon lager, but after your comments I’m thinking I may just try this one in my keg fermenter. Have you had any problems with the blowoff gunking up the keg posts? That’s probably my biggest worry.
Appreciate the post, I learned a few things this morning.
Hey Craig – thanks for the note! I haven’t had any issues yet, although I do err on the side of smaller batches. I would lean towards just under 4.5 if you’re worried. I also typically don’t have wild fermentations anymore since I started fermenting cooler (mid 60’s). Seems my days of blowing lids off plastic buckets were largely due to hot ferments with no temp control. I would go the blowoff tube route so you can see if krausen is getting into the tube. Could also keep the PRV open as a fallback.
Fermenting in kegs is definitely a great way to go if you don’t have a lot of fermenters lying around! I have 6 kegs and always have at least 1 or 2 available to be a fermenter. So far I’ve done 2 keg ferments (from a partigyle of an English brew). I’ve got a 1.064 and a 1.040 in each keg and was able to transfer some of the trub out before it ran clear. I carbonated both at 10psi for a week and the first pours were more trub which is helpful. I dialed it back to 6PSI serving and both are pouring clear and tasting great. I will note that these are 3 gallon batches (10gal total blended into a 4gal, 3gal, and 3gal). I didn’t trim the dip tubes, but may invest in the floating dip tubes if I plan to transfer to serving kegs (can’t beat the price for $17 each tube). I wouldn’t mind trimming the dip tubes, but for the price I’d rather not and keep extra tubes on hand.
Great write up!
I use packing bubble wrap over my temp probe and Fermcap to reduce foam while pressure fermenting.
I’ve started doing this, and torpedo has made 6 gallon kegs which are perfect. I now have three and sold my anvil 7 gallon fermenters.
Hey mate,
Thanks for the great write!
So I am fermenting in corny kegs for 6 months and I have mixed feelings about this. I love the ease not having to clean an extra fermenter and be able to carbonate a beer naturally.
However, since I started fermenting in kegs, my beers seem to stay hazy for a longer period of time. I use 5g corny kegs and use mostly highly flocculant strains, after a few weeks I pressure transfer into a new keg and the beer still stays cloudy, even after 6 weeks of lagering. The beer even has small white chunks of yeast that are in suspension and I haven’t found a good solution for this. I tried a floating dip tube, but it eventually sucked up Co2. I already ordered some stainless steel screens / filters for these floating dip tubes and hope this will fix the problem with cloudy beers.
Hey Dave – I’ve mostly brewed NEIPAs so when it comes to clear beers it’s harder for me to give advice. I did ferment 1 west coast IPA and a blonde ale in a keg and I had no issue with yeast or haze. I guess my question is are you cold crashing down to at least 35F for 48 hours post fermentation? And are you leaving enough headspace during fermentation? I prob fill a 5-gallon keg with 4-4.5 gallons of wort. I’ve never used screens or filters in any of my beers. A cold crash is usually all I need to drop everything. Intense/large dry-hopping amounts can add some lasting haze just as well.
My only other suggestion would be to use Biofine to help drop the remaining yeast out of suspension. I’ve never really cared about clear beer but you def should not have chunks of yeast floating around. My beer usually gradually clears over a few weeks at serving temps. Hope this helps.
In regards to fermenting 4.5 gallons in the corny and only having that much (or less) transfered to the serving keg, I say that DOES NOT have to be the case. I trimmed my dip tube down to leave exactly one quart worth of yeast trub behind. If, after the boil, you transfer the entire 5 gallons into the fermenting keg and have enough to also fill 1 quart into a Mason jar which you then save in the fridge, you will be able fill and serve 5 gallons into a serving keg, just as Ninkasi intended. You will only need the said qt Mason jar with a lid, a 1 gallon glass jug (okay, you’ll have to buy some apple juice), a drilled rubber stopper and airlock. After boiling, fill the fermenting keg completely and the qt jar. After no-chilling the fermenter keg the next day, rack off 3/4 gal into the gal jug and pitch a small amount of the yeast into it, then put the stopper with airlock on it and ferment along with the 4.25 gal left in the keg. When fermentation is complete, cold crash or whatever, then close transfer into the serving keg. This will fill it with 4 gal and leave 1 qt behind (as planned). Carefully, open the lid and transfer the 3/4 gal from the jug into the keg, I would use a funnel with a piece of tubing to minimize air influx. Then open the qt jar and pour that in as well. Close up the keg and purge it a few times. This will basically start a small refermentation from the added gyle but probably not enough to fully carbonate it. Now you will have the full 5 gal, more or less, and can continue to force carb it in the keezer or spund it first. Voila!
So you dry-hop directly in the fermenting keg with no bag/filter? You find that cold crashing after that eliminates enough hop matter to not create harshness or clogged dip tubes?
Yes – it’s a combination of a good 48 hour crash and ALSO, ensuring that your dip tubes are short enough to not suck up too much trub.
so i couldn’t really tell if you are using the blow off tube in star san for initial fermentation than switching to spunding valve. or just using spunding all the way through. if so what psi are you setting it at. really like your articles thanks.
What styles would you pressure ferment and what temperatures would you pressure ferment those styles?
Hello! Probably a very dumb question. I just started fermenting this way; if I dry hop at high krausen, do I need to pressure seal my lid using CO2 so that when fermentation is complete, no oxygen could come in through the lid?