
 by
by 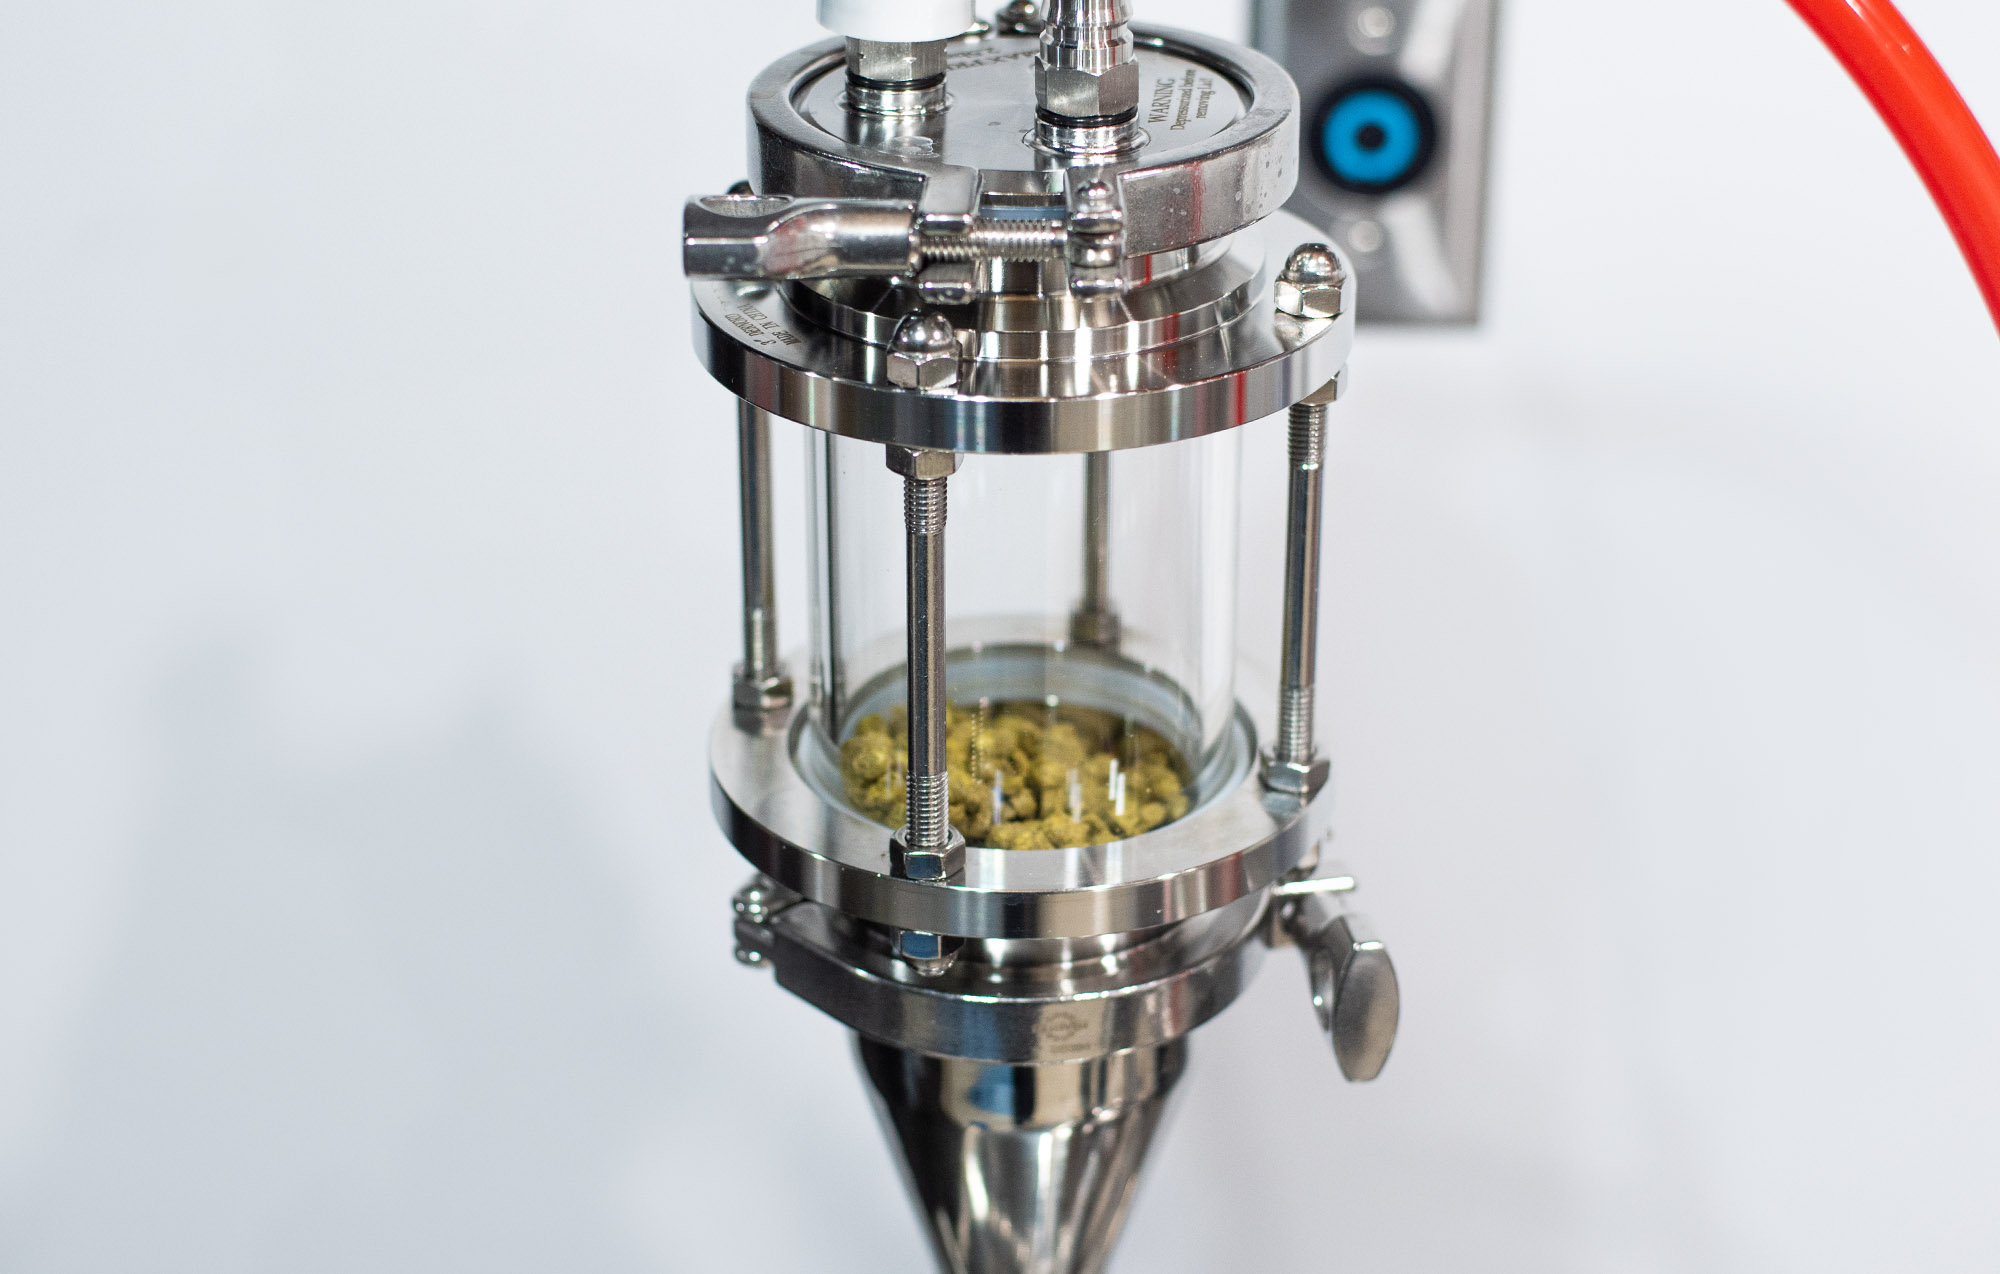
I never thought I would go as far as building a dry hopper device to be honest, however, after investing so much into a conical, I figured I might as well take it all the way and eliminate the last oxygen hurdle. Why does this even matter? Well, with mine and everyone else’s obsession with brewing NEIPAs, we need a way to add hops without introducing oxygen along with it. Oxidation destroys IPAS, but especially NEIPAs.
Even with a conical, homebrewers are more susceptible to beer oxidation than commercial brewers based on pure volume of beer relative to the amount of oxygen exposure when opening a vessel to add dry hops. In other words, homebrewers need to be more careful about dry hopping techniques than commercial breweries.
Dry Hopper Build
My goal was to build a ‘not totally ridiculous’ zero oxygen dry hopper for a 1.5 TC fitting on the lid of my conical. Hop dosers easily get very expensive because most utilize wide site glasses or pipes to hold the hops. You also need an easy way to purge the space with CO2. Lastly, it needs to be large enough to hold a large dry hop charge. I put together a smaller, more budget option as well as a larger and slightly more ridiculous option. Both seem reasonably budget-friendly relative to the cost of buying a premade one.
Since the accessory lid port on my conical is only a 1.5″ TC ferrule, I wanted a cone-like shape to help funnel the hops in and not have too narrow of a space for the hops to get stuck. A butterfly valve makes for easy flipping from my blowoff tube, hopper, or PRV. Luckily, I was able to source all my parts from Amazon really quickly.
Purging Oxygen
There are two paths to remove oxygen from the dry hopper. One, purge via the top of the dry hopper through the PRV/gas lid OR by using the conical itself. My fermenter has a gas port on it so I can install my dry hopper, crack the butterfly valve to the dry hopper, and force CO2 through the entire system and up through the dry-hop chamber. This will do a better job at purging the entire space inside from the bottom up, especially if you pre-purge before adding hops.
Build #1.
My first variation runs around $80-90 depending on if you have an extra 1.5″ TC clamp and gasket on hand. It does not have a sight glass so you’re blind to the hops actually dropping however you can hear them fall in. I have to rock my valve handle back and forth several times to get them past the valve and into the fermenter. FYI, I’m assuming you already have a 1.5″ TC and gasket to attach the dropper to the conical itself.
This hopper holds about 4 ounces of hops (without overstuffing). It’s smaller but you can also add hops in two rounds if you’re on a budget. After some trial and error with this version, I’m not sure it’s worth the aggravation. The 1.5-inch butterfly valve promotes “hop bridging” and prevents the hops from being able to fall through effectively, especially when packed in.
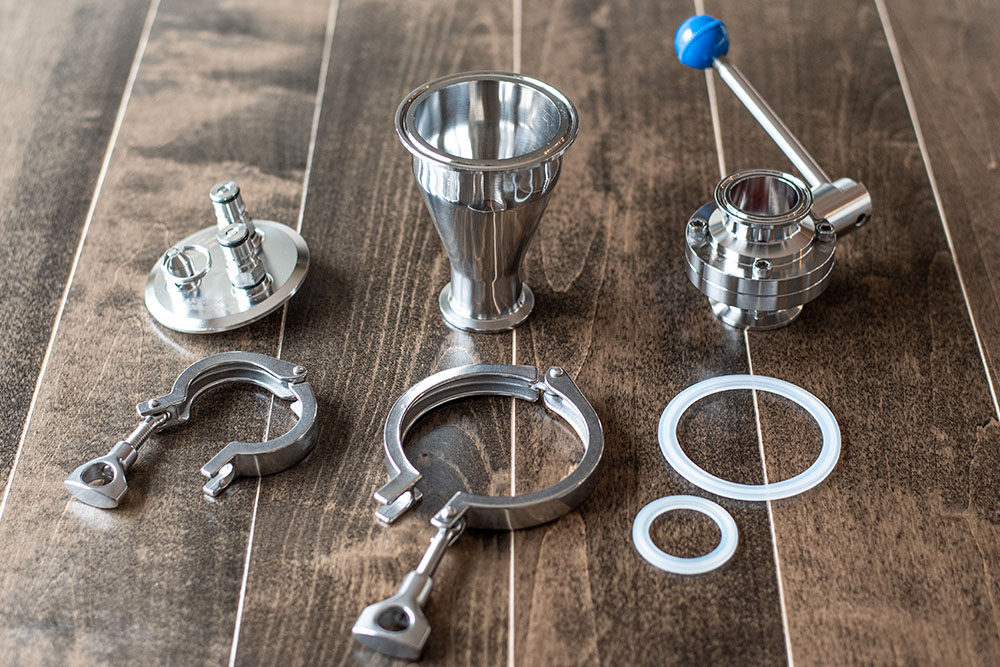
Parts List

Build #2.
My larger variation runs just under $150 and requires an additional 3″ TC clamp and a 3″ sight glass. This of course can hold A LOT more hops and also gives you some vision on the inside.
A hybrid of this build would be to use a 4-inch long 3″ TC spool tube to add some additional capacity without the expense of a sight glass. These are around $20 and will save you some cash (around $120 to piece together).
PS, if you have a RipTide pump, the TC clamp is 3″, so you can borrow it for DH day. Like the above option, you’re still going to run into some issues with hops getting hung up before the butterfly valve.
Parts List

Build #3.


Build number 3 is extreme… but really versatile and works the best. The problem with the previous options is the lack of space between the 1.5 TC port when a butterfly valve is added. The hops can have a difficult time fitting through the now tighter space. My solution was to place a 3″ butterfly valve before the reducer in order to free up space by the 1.5″ port.
I did a test with Cheerios…yes Cheerios, and it works a lot smoother. The trick is to slowly engage the butterfly valve to control the trickle of hops through the narrow part of the chamber. I did the same Cheerio test with the 1.5″ valve and ran into the same issues as my initial hop testing. This design would work for a 3″ TC port on a Ss or Brewer’s Hardware conical (no reducer) or any conical with a 1.5″ port (with reducer).
The build is very similar to this, but runs you around $220 for the hopper itself or even less depending on if you have some extra 3″ TC clamps (RipTide pumps!). I sprung for the extra $20 to get the reducer cap for my blowoff tube during fermentation. An extra port in your lid would save you some cash on this. You can also save some money if you opt for a stainless steel tube in place of a sight glass.
You can also finagle a 2″ version of this build it’s just harder to find a streamlined 2″ TC PRV/gas cap. I recommend Spike’s gas manifold to build a full 2-inch variation using a 2-inch reducer, butterfly valves, and spool tube. I’ve confirmed with some other homebrewers that it’s a viable and functional option!
Parts List

Forgive me for asking a potentially stupid question here but I am about to purchase the parts for your option 2 and had a question. What equipment do I need to pressurize the sight glass other than what you listed above? I have never pressure fermented before so I don’t have co2 or anything like that, just starting from scratch. So what would I need to make that option work? I have a Spike CF5 by the way.
I would highly highly recommend you do a hybrid of option 3. You absolutely do not need a sight glass if you’re using a 3-inch BV because the opening isn’t constricted and your hops will easily pass through. In that case, you can use a stainless tube instead of sight glass and save some money. Build #3 can also be accomplished using a 2-inch BV/build. Either option is better than the 1 inch TC passageway.
Lastly, I use my kegging setup for CO2. I would look into a CO2 setup for ball lock kegs. You can use this to pressurize kegs, fermenters, and purge your dry hopper as well. Hope this helps
This helps, thanks. Do you typically buy your CO2 setup at like Home Depot, Amazon, etc.?
Look at AIH or MoreBeer for keg setups. Or wherever you like to buy brewing equipment online. You’ll have to find a local homebrew shop or gas place to swap out CO2 tanks as you can’t purchase them full online.
Thanks! Found a good deal on Northern Brewer for a keg setup and a CO2 tank from a local welding/gas shop.
Thanks for the great write up – sounds like the 1.5” BV is too much of a hassel. So I’m gonna go with some version of build 3. Can give a couple more details: how many oz of hops can the sight glass hold? How tall is the whole build 3 o stalled with the sight glass and reducer? I might have a clearance issue in my fridge. 🤔
Also curious what you think about version (trying to save by using a 2″ BV, which hopefully works way better than a 1.5″ BV) hopefully I can fit 6 oz in the 2″ to 3″ reducer.
1.5″ port on lid -> 1.5″ to 2″ reducer- > 2″ BV -> 2″ to 3″ reducer -> 3″ ball lock liquid/gas/prv
Wouldn’t the reducer under the ball valve hold an awful lot of oxygen and somewhat negate the benefit of a dry hopper?
No, becuase that is attached during fermentation. That entire chamber will have O2 pushed out of it during active fermentation. It’s essentially part of the vessel.
Shawn, I just found your site. Quality.
Considering adding a steam condenser to my lid for my basement brewery.
If both my kettle/brewer have TC ports, could this hopper be used for hop additions during my boil, as well?
Might even serve as a nice counterweight to the condenser on the lid.
It could – although it may be really heavy and not worth the aggravation to be perfectly honest.
cool. Thanks.
Are you just lifting the lid with your condenser attached to add hops, then?
Yeah I have the steam slayer so it’s not that heavy. I just crack the lid and throw hops in. Actually these days my steam slayer is mounted to the side of my kettle so my lid is free.
I installed a dry hopper as well and love it. Question on the timing. When recipe says dry hop for 3 days. Do you cold crash in the conical fermentor after three days? Or do you transfer to a keg after 3 days. I just did a batch were I cold crashed in dumped the hops out couple days after cold crashing. The beer definitely tasted a lot more hoppy after those couple of days.
Dry hopping for 3 days means your dry hops are in contact with the beer for 3 days before likely crashing and dumping them out. I can’t assume anything else without reading the actual recipe but that is most likely. There is always going to be an extended conditioning phase after the DH.
I only have one 3″ port on the top of my fermentor that i use for a blow off tube, i was thinking of doing something similar with a small hole drilled into the butterfly to let the co2 out to the blow off tube. Would it affect the hops if the co2 was blown off through them before we open the vale to let them drop down?
fermenter lid>3″ butterfly valve with small hole drilled>3″ site glass>3″cap with blowoff tube.
Hey Shawn,
Thanks so much for your work in publishing all these awesome articles. They have helped me step up my beer game a good deal, so, cheers for that. I am trying to buy the parts to make #3, but it seems impossible to find a 3″ butterfly valve anymore. Amazon has the 2.5″ or the 4″, but not the 3″. I’ve looked a few other places and the 3″ seems to have vanished. Any thoughts or suggestions on that?
Thanks again.
Will
Hmm – you may want to try Brewer’s Hardware or another site that offers a lot of SS components. I’m not sure why other than all the supply chain issues a lot of these components are getting hung up on.
what do you think the max PSI is on these build? I will be fermenting under pressure on some occasions, thanks!
Not sure TBH. I’ve never gone above 7-10 PSI.
Shawn,
Just built mine today but I am questioning the build of my valve. Can you post a picture of yours fully closed? Maybe I am doing something wrong but I have a slight gap and if I can’t seal the valve won’t this DH be useless?
Thank you!
A butterfly valve should seal all the way shut. The valve could be faulty. It may be tight to close all the way. Perhaps you need to apply more pressure? Lastly the valve alone should not be used to seal it off for pressure safe brewing. The BV valve should be sealed off via cap or PRV like I have in the build.
Great write up, and I like the parts links. Do you, or anyone here who has built something like Option #3 with a 2″ sight glass and BV, say how many hops can be accommodated?
I suppose if you used another reducer (2″ to 1.5″) above the 2″ SG (to get back for a 1.5″ manifold atop the system), then it could hold even more hops, or do you not want to fill above the SG with hops?
I am considering a build of option #3. My 1-bbl conical fermenter sits in an upright freezer during fermentation so that I can control the temp from the 70s down to 32F. As such I don’t have room to do a pressure transfer of hops from above; I would need to blast them in at the racking port, which is about 6″ above the bottom of the cone. This implies I have to push the hops in with enough pressure to counter the hydrostatic pressure of the nearly 31 gallons of beer. I think that’s in the range of 16psi. Do you think I’m likely to get the hops stuck in the 3″ butterfly value or other problem with that kind of pressure behind the hops?