
 by
by 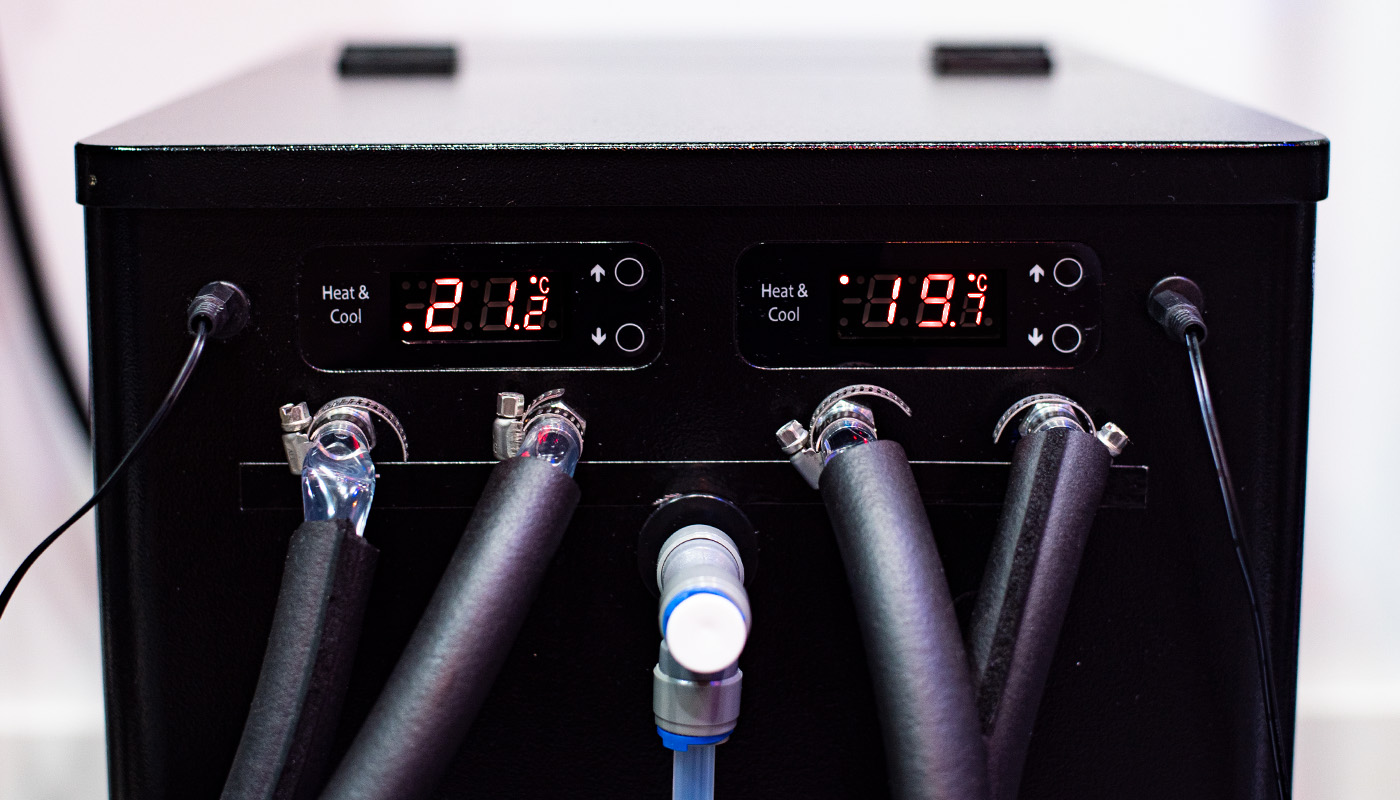
Glycol systems at the homebrew scale have become increasingly popular. They’re compact, really efficient, and do an exceptional job with both temperature control and cold crashing. Once you start adding several conical fermenters, fridges become less practical.
I’ve been using the BrewBuilt™ IceMaster Max 2 Glycol Chiller for the past 6 months and I think it’s a pretty solid unit. While this is my first glycol chiller, I wanted to cover the pros and cons and my overall thoughts on the system.
Product Overview

The IceMaster Max 2 is designed to cool up to two small fermentation vessels (15 gallons each). It features 2 built-in submersible pumps with independent digital temperature controllers. It can be used with any vessel that has a glycol jacket or cooling coil/rod. BrewBuilt also offers an IceMasterMax 4 model which is very similar but of course designed for controlling 4 small fermentation vessels. BrewBuilt also offers an IceMaster 100 unit, which is purely a glycol reservoir that requires external pumps. More on the differences later.


Each controller (next to the displays) includes a digital temperature probe that can be inserted into a thermowell in your tank. The digital controller will measure the temperature of your tank and toggle the unit’s submersible pump on or off to cool to your desired set temperature. The IceMaster Max 2 can maintain temps and cold crash up to two vessels at once. While I have not personally tested this, the Max 2 is listed to have the ability cold crash one 1 BBL tank or two tanks up to 15 gallons in size at once. Priced at $699, it may be the most affordable all-in-one glycol chiller on the market, but does it deliver?
Some glycol units require you to purchase additional submersible pumps to control the flow of glycol to your fermenter, however, I was intrigued by the Max series because everything is built-in and ready to go out of the box. Outside of a few minor setup steps, I had the chiller up and running really quickly. As a quick tip, the hole for the glycol reservoir is pretty small as you can see below. You can remove that cover panel or I’d recommend filling with a funnel so you don’t pour glycol everywhere. Believe it or not, it takes a little skill pouring a gallon of liquid at that angle.


Using the IceMaster Max 2
When it comes to pure cooling capability, the IceMaster does a great job. I’ve had no issues using it with cooling rods and or a true jacketed unitank. Cooling capability is largely dependent on the fermenter’s cooling coil/jacket rather than the glycol system itself (assuming it’s not junk!). That being said, I was easily able to crash my 8-gallon jacketed unitank down to 34°F in under 2 hours.

For any glycol system, you’ll need to fill it with a distilled water and glycol solution. The actual ratio of water to glycol will actually impact your solution’s freezing point. This is not something I will dive into but I used a ratio of 3 parts water to 1 part glycol, resulting in 4 total gallons of solution in the 4.5 gallon reservoir. I set my glycol reservoir temp to -2.7°C, which is about 27°F. The recommended glycol solution temp range for cold crashing is about 26-28°F for best results.
The Max 2 has 3 digital displays. Two on the front to display and manage set/target temps and another on the back which controls the temperature of the glycol reservoir among a few other calibration settings. If I’m being perfectly honest, the worst part about this unit is the semi-awkward control settings. You have to use a combo of simultaneous button pushes to adjust various settings up or down. It’s not the end of the world, it’s just annoying because you can accidentally change the wrong setting if you slip up. The directions that came with my unit were REALLY bad. Luckily, BrewBuilt has recently updated its instructions to a MUCH better document. I would not be surprised to see other future enhancements/tweaks down the line.
Setting the actual fermenter target temp is as easy as pressing the up arrow for 3 seconds and using the up or down arrow to adjust. Since this is really the only tinkering you’ll need to regularly, it makes for easy adjustments. I really like how the unit uses 1 decimal place so you can really dial in an exact temp. This is necessary since the unit ONLY displays in Celcius and not Fahrenheit. There is no way to toggle back and forth. At first, I was a little annoyed but let’s be honest you really only need to know a few numbers anyway so I’m over it. Plus, I use a Tilt Hydrometer and always have a Fahrenheit reading at the ready.
Drawbacks
I don’t have many bones to pick with the Max 2. Some things to note are the unit does not come with wheels or casters and I’m not sure you can buy them. This is fine once you get set up but it’s very difficult to move when full of glycol (spills). Mine sits up against a wall and I have to very carefully pull it out to adjust the back panel controller. I may make a dolly or small platform with casters down the road. I’d note that the Max 4 and 100 units come with wheels and have all controls on the front panel (aha).
Another thing you should know is when the unit is turned on, both pumps are activated. There is no way to turn one side OFF if only using one fermenter. If you only have one fermenter hooked up, you’ll need to create a mini tubing loop from the IN to the OUT barbs to prevent spraying glycol on the floor. The alternative (or fallback) is to set the temp range on the unused side to a very high temp so the pump doesn’t ever fire. This is one slight drawback with built-in pumps. You’ll have less independent control and will have to forfeit external heating capability controlled by a singular source.
If the temp probes are unplugged from the unit, it makes a constant beeping error until you plug it back in. As mentioned, the unit only functions in Celcius…so learn up on that in the meantime.
Which Chiller Is Best For Me?
I wish I had some better guidance on glycol units in general when I was first researching them. It can be a little confusing on what’s what. I’ve tried to break down the main differences between the 3 units BrewBuilt offers.
- Max 2 ($699): Perfect for 2 small fermenters. Has 2 built-in pumps so you’ll only need tubing to get up and running. This will integrate with just about any major fermenter out there. I used Spike’s insulated tubing. Drawbacks are less control over temp as the probes will only toggle cooling pumps.
- Max 4 ($899): Perfect for 4 small fermenters. Has 4 built-in pumps so you’ll only need tubing to get up and running. This operates similarly to the Max 2.
- 100 ($749): Strictly a glycol reservoir for 4 small fermenters. You will need to purchase a separate submersible pump to push glycol solution to each of your fermenters. The main advantage here is greater control over your heating and cooling from a singular temp controller. In theory, you’d be using an InkBird controller or similar external controller in place of any native controls on the chiller. A great option for those looking to grow with their system.
Final Thoughts
Overall, the Max 2 works as it should and does a great job cooling/crashing my precious brew. The value here is pretty high given some of the minor quirks. I can’t say any of these are deal-breakers, you just need to learn how it works. Adding external pumps can easily add hundreds of dollars to any glycol setup. You need to make sure you factor that in when pricing out a system. Regardless, all three systems are very competitively priced and great buys in my opinion.
Value/simplicity is a huge reason I went with the Max 2. It’s a really solid entry-level glycol system that performs well and won’t break the bank. I’m pleased with my purchase and I’d absolutely recommend this system for anyone looking to control two 5-15 fermenters. If you’re interested in other BrewBuilt gear, check out their new gen 2 kettle and conical fermenter.

I have this unit and I accidentally discovered that if you press and hold the down arrow on either controller long enough, it’ll turn off the controller. This means you don’t have to permanently have a piece of tubing connecting the in and out port and having the unused pump running. The best part is, even after shutting off the entire unit and turning it back on, it remembers to keeps the “off” controller “off” – give it a shot.
Really?? So I’ve done this before but never knew what it actually achieved. The directions don’t mention that feature at all…which TBH is a great feature. Always wondered the purpose of that. Thanks for the tip!
I’ve tried this but how do you turn it back on? Holding down the up bottom will turn it back on and starts to blink then after a few second of no action it shuts of completely again. Holding the bottom button down does nothing when off?
Pressing and holding the “down” button will turn the controller on, or turn it back on. Pressing and holding the “up” button is how you change the setpoint. You pressed “up” with the controller off, which briefly turns the display on to allow you to change the setpoint, but then it turns back off.
I have this unit too and I made some mods to it:
This set of casters from Amazon worked perfectly for me:
2 Inch Swivel Caster Wheels Set of 4, Locking casters Heavy Duty Total Capacity 330lbs, Metric M8-1.25 Threaded stem TPR casters with Brake, castors for Carpet Hardwood Floor Workbench Bed Frame.
Also, there’s a more detailed instruction manual available on the Kegland Australia website for their brand of the same chiller. There are some useful wiring diagrams and instructions shown. I spliced an extension chord wire to connect my Spike conical’s 120V heater to the chiller controller’s available extra relay. Now the chiller can heat/cool my fermenter using the single temp probe (like an Inkbird). This is useful when the ambient temp drops low at night, and get too warm during the day. The heater mod can be applied to both channels of the chiller.
Thanks for the review. I ended up buying the BrewBuilt IceMaster Max 2 today. Have you ever tried to use the chiller as a wort pre-chiller?
No not really. Sometimes I’ll transfer wort to the fermenter at around 80 and chill it down to 68 from there but that’s it.
Try and drain the unit! When I tried to open the bottom sight glass plug, the plastic pipe broke. Can I use the unit without the sight glass?
HK
Unfortunately I cannot speak to this. contact BB support.
Do you leave your glycol solution temperature set Point at -2.7C? Or when actively fermenting and not cold crashing do you use a different solution temp? Have you ever had freezing with your solution ratio and -2.7C?
I always keep glycol at the same set temp range.
Hey, Shawn
I am fermenting my first beer with this glycol. I am veeeery disturbed by the amount of noise it makes. I leave it in my leaving room and I am willing to find a solution for it before brewing my second batch.
Is yours very noisy as well? I’ve read some people tightening the fan screws and it getting better.
I am leaving mine at -2.5c It take quite some time to drop the temp from 4c to 3c in my fermenter, almost a full our, and I have all lines insulated as well as the SS brewmaster edition conical. I was surprised to read that you crash it to 34f in 2 hours.
I have a glycol jacket on my fermenter so it’s much more efficient than a coil. Sorry for the late reply here but I’ve never noticed the chiller to be loud. Mine is in the basement so it’s not something that’s ever bothered me. You may have a dud I’m not sure.