
 by
by 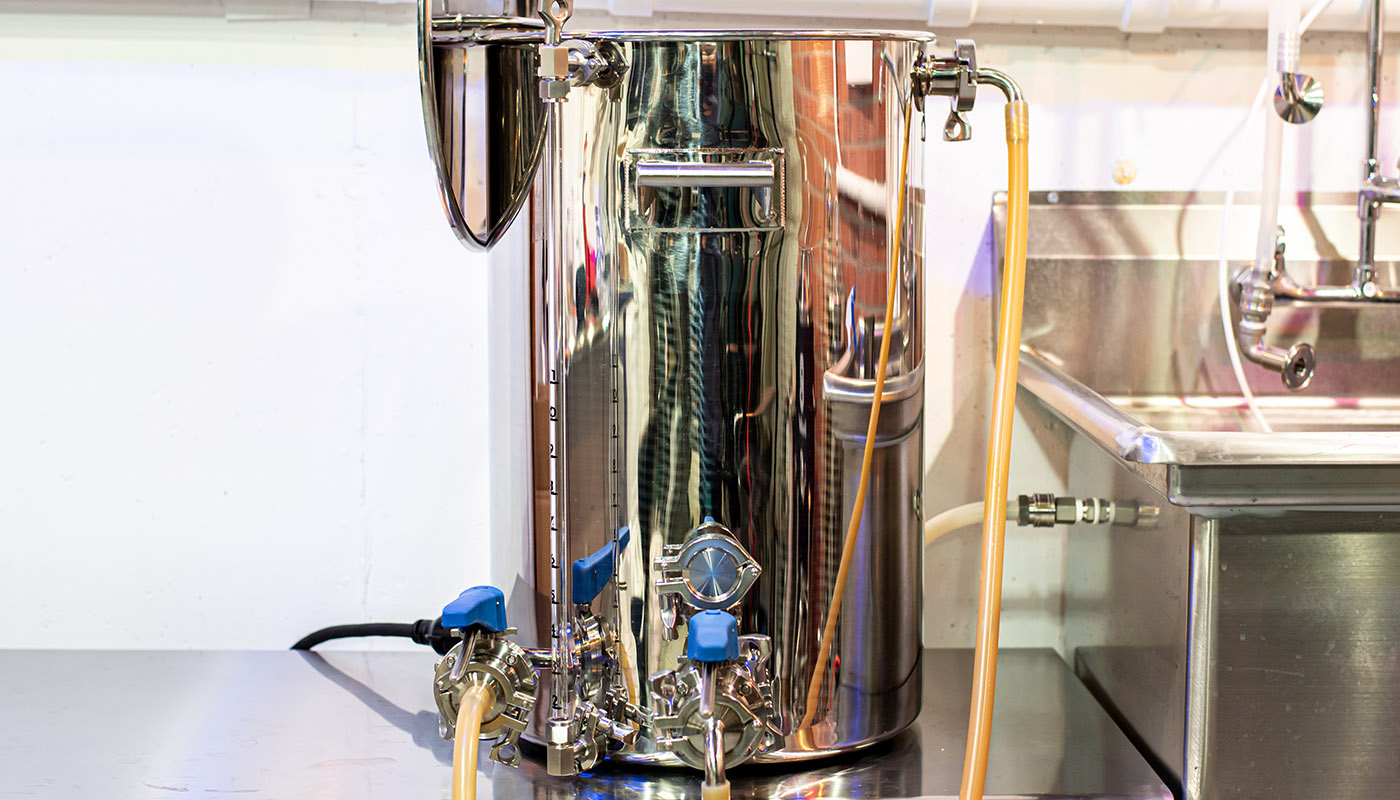
I recently upgraded my electric kettle to a custom Brewer’s Hardware 20-gallon stainless steel boil kettle. Given they’re one of the lesser-known kettle providers, I’d love to share my experience customizing my kettle and how it turned out. So far, I’ve been incredibly pleased and I could not recommend Brewer’s Hardware enough. Let’s dive into the details.
The Kettle Overview
Brewer’s Hardware offers a range of kettle configurations that can be customized to suit the homebrewer’s needs. Their kettles start at 15-gallon capacity and go all the way up to 63 gallons. I started with a 20-gallon boil kettle with a tangential outlet and ordered additional welds. My kettle came standard with 3 total TC ports. The most unique is the tangential outlet designed specifically for whirlpooling.
All Brewer’s Hardware kettles come standard with tri-clover ports, front/back handles, 1-inch pickup tube (I love it), and a mirror polish inside and out. The kettle feels hefty and features a 1.2mm wall thickness. Similar to Stout Tanks’ design, BH kettles are taller and more narrow than your typical brew kettle. Another aspect that sets Brewer’s Hardware kettles apart is their non-triclad bottoms. While thinner than your typical brew kettle, this can actually play to your advantage depending on your needs.
The lid is very sturdy and sits nicely on top of the kettle. The heftiness was one thing that caught me by surprise as I was unboxing the equipment. The lid also features a little clip that allows you to hang the lid off the lip of the kettle rim. My only initial “complaint” about the lid handle is it doesn’t have a silicone grip. That being said, the handle doesn’t get hot even after an hour of boiling with the lid on. This basic kettle configuration starts at $360.
Customizing My Kettle
The kettle customization process is as simple as sending your requirements via email, phone, or adding welds to your order on their site. Brewer’s Hardware is easy to reach and always really helpful. The welding work done on my kettle was top-notch. I’m not someone that tends to get overly obsessive about welds, but I was really impressed with the neat workmanship and near flawless finish. Everything was done exactly how I asked.
Brewer’s Hardware currently charges $40 per 1.5-inch ferrule weld. Just to mention, the pictures in this post are after several batches. Please excuse the watermarks and scratches from my false bottom. The kettle was not delivered this way.
Brewer’s Hardware welded three additional 1.5-inch tri-clover ports to my kettle. Since this would be an electric BIAB setup, I needed dedicated ports for my heating element, a temperature probe, and my steam condenser/recirculation arm. The most notable customization of my kettle is a bottom drain. This allows me to fully drain the kettle for easy cleaning in place.

Many custom kettle providers can’t add bottom drains due to their tri-clad bottom construction. Drilling the material can destroy the integrity of the kettle. While the base of the BH kettle is not as thick as competing kettles, it’s not something that impacts my electric brewing capabilities.
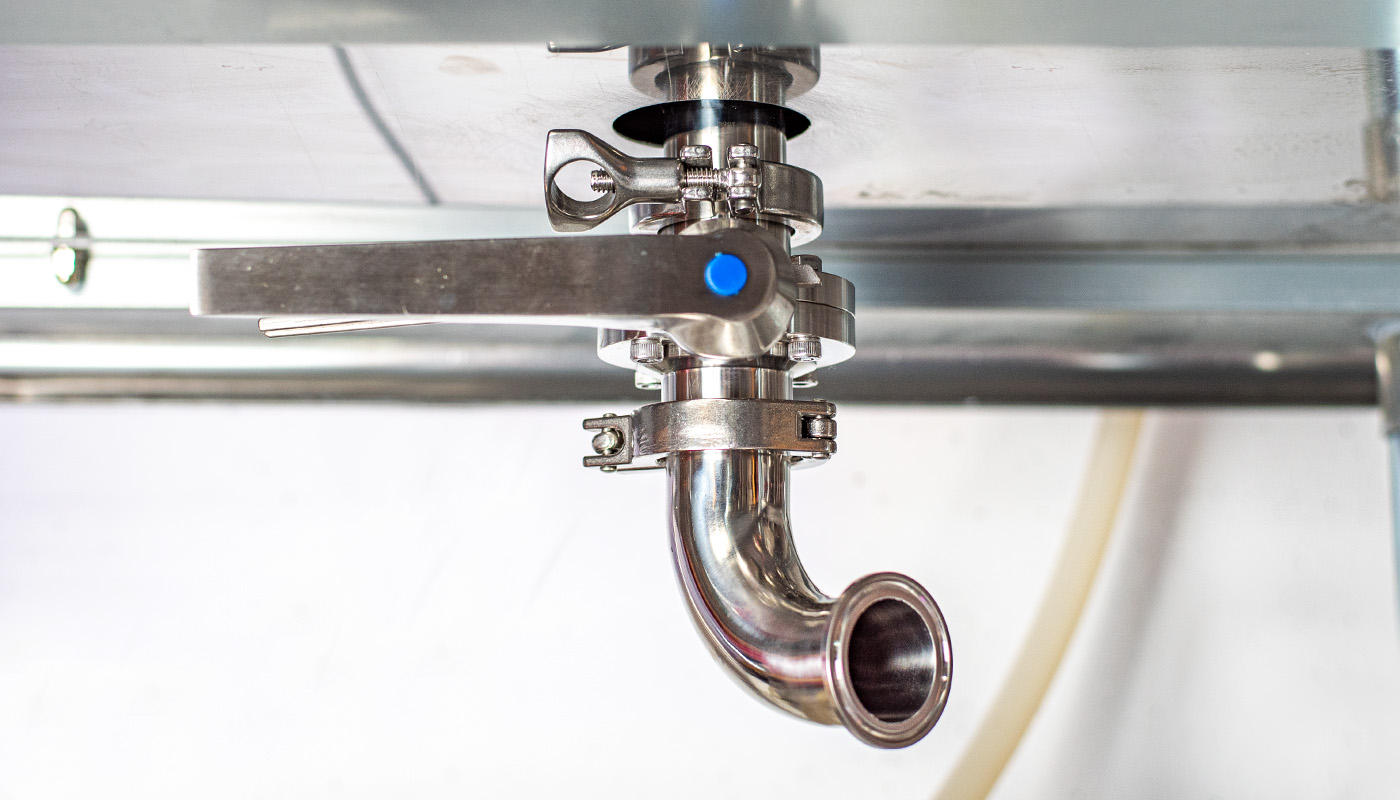
I used a 2 3/8″ tungsten carbide hole saw drill bit to put a hole in my stainless brew stand. This was relatively easy and doesn’t harm the strength of the table. If you have a wooden brew stand, this task is even easier. Just make sure you give yourself enough clearance if your table is thicker. All ferrules were standard.


Sight Level Glass
Brewer’s Hardware kettles don’t come with gallon etchings or markers. This was probably the one feature that made me a little hesitant when evaluating the brew kettle. Reading water levels is obviously critical throughout the entire brewing process. Luckily, they do have a solution that actually ends up working out better in the long run.

BH’s sight level glasses are easy to install and feature 1/2 inch tri-clover connections for easy removal. You will need to purchase number decals (I love these) and manually calibrate using 1 gallon of water at a time. While this sight glass is on the more expensive side ($120), it looks awesome and works really well. All components and welding work is included with the cost of the sight glass.
I was initially concerned the sight glass would be a pain to clean, but it’s actually really easy to rinse in place with my hose. If that’s not enough, it removes very easily thanks to the small tri-clover connections. At this point, I actually prefer the sight glass over etch marks because it makes taking readings that much easier!
Final Thoughts
Overall, I really love my Brewer’s Hardware kettle. It looks awesome in my brewery and matches nicely with my BH unitank. BH equipment is worth the extra investment if you’re serious about the hobby. Their customer service is great and they’re always easy to reach over the phone for questions etc.
Bottom draining kettles are much harder to come by for homebrewers. While they require some extra planning, they make cleaning and draining larger kettles that much easier (especially if you brew indoors). My cleaning process now consists of opening my bottom drain and hosing down the kettle with hot water. This removes 90% of any build-up and grime in about 30 seconds. Yes, it costs a bit more, but saving time on cleaning is PRICELESS. For me, this is a huge perk and one of the main reasons I went with this kettle.
I would highly recommend you give Brewer’s Hardware a good look if you’re planning your next system. While my system is very “simple” they can help you piece together a more complex 3V system as well. If you’re looking for my exact 20 kettle configuration, it will run you $600 for all welds and the sight glass. Brewer’s Hardware 100% has my stamp of approval and I cannot recommend them enough.


Wow! A center drain on a homebrew kettle for eBIAB is brilliant! One day, I can only dream for now 👍🏻
Are etchings on the kettle not even an option? I too would prefer that for simplicity sake.
Not as of now. They may have some other solutions in the future. I’m loving my sight glass though.
So what’s your full set up like? Are you using a bag in this kettle? False bottom? Sparge/recirculation arm? I’d love to see a video of you walking us through it. How’s the bottom drain working out?
Bottom drain is awesome. I use a false bottom, recirculation arm from Ruby Street Brewing, and a brew bag. I plan on doing some more documentation down the line!