by
by 
Disclosure: Brewer’s Hardware provided me with a deep discount on all equipment in collaboration for this review.
I recently had the pleasure of working with Brewer’s Hardware on reviewing their 8 Gallon Stainless Steel Glycol Jacketed Conical Fermentor. While this review specifically applies to the 8-gallon model, the information honestly carries over to their larger tanks as well. Brewer’s Hardware produces both jacketed tanks and non-jacketed tanks. In this review, I’ll briefly explain the benefits/differences and my hand’s-on experience using this beast of a fermenter.
Brewer’s Hardware may be one of the lesser-known fermenter providers for homebrewers. There isn’t a ton of information about their products online and you’ll have to do some deeper digging on Homebrew Talk to learn more about their products. While I’d only read positive things about their fermenters, I was really curious to take the plunge and see what they were all about. Are these tanks the hidden gem everyone makes them out to be?
Jacketed vs Non-Jacketed Conicals
I think it’s important to first touch on WHAT a jacketed conical really is. To clarify, a jacketed tank is not simply a fermenter with a neoprene jacket. A jacketed conical consists of a lined enclosure surrounding the inner wall of the tank that houses glycol solution for cooling and heating.
Most conicals at the homebrew scale offer a cooling coil that sits inside the tank. The main advantage of a glycol jacket is superior and more even temperature control with of course one less bulky piece of equipment to clean. Brewer’s Hardware offers the smallest dimple-jacketed fermenters that I’m aware of. Their tanks are also insulated with a 2-inch thick layer of foam, meaning they’ll retain temperature better and won’t sweat. More on this later.
Product Overview
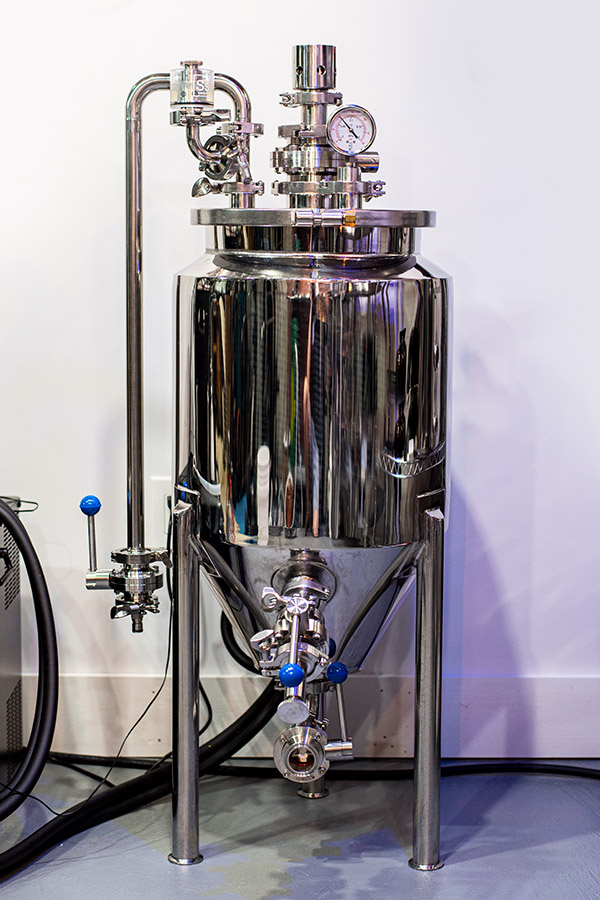
The Brewer’s Hardware 8-gallon jacketed conical ($1,250) is a premium fermenter designed to ferment a max volume of about 6.5 gallons of wort. The tank features a mirror polish inside and out and is an absolute masterpiece to look at. Anyone who’s seen this thing basically has the same reaction. Holy crap, what is that?

The base 8-gallon model comes with everything you need to get started right out of the box (all butterfly valves, gaskets, and clamps, etc.). There are also a few pictured upgrades you can add on if you please. While most of my order was pieced together a la cart, you can get everything you need to start fermenting directly from brewershardware.com with the exception of a pro spunding valve.

One of my favorite things about this tank is the massive four-port lid. The lid features three 1.5 inch TC ports and a larger 3 inch TC port in the center. The stock lid clamp is rated for 4-5 PSI and is fastened with a very large 12-inch tri-clover clamp and gasket (see notes on lid upgrade below). The lid is really heavy-duty and is pretty hefty in weight as an FYI.
The supplied 16-inch thermowell installs through the lid and extends into the cone, making the minimum batch size about 3 gallons. The tank also comes with a basic 90° 5/8 blowoff barb and TC caps for all lid ports. The only other thing you’ll need to buy separately to get started is 1/2 inch ID silicone tubing to submerge in a blowoff bucket.
The body of the tank features 2 ports—a bottom 1.5-inch dump valve and a 1.5 inch port for transferring/sampling. One of the nicest features is the rotating racking arm that comes standard with the tank. The unique part about this arm is the 2 additional o-rings to help maintain a leak-free seal when actually rotating the arm. You must loosen the port’s TC clamp in order to turn the arm, which of course puts you at risk of leaks. The additional o-rings give you a lot more flexibility and prevent the issue.
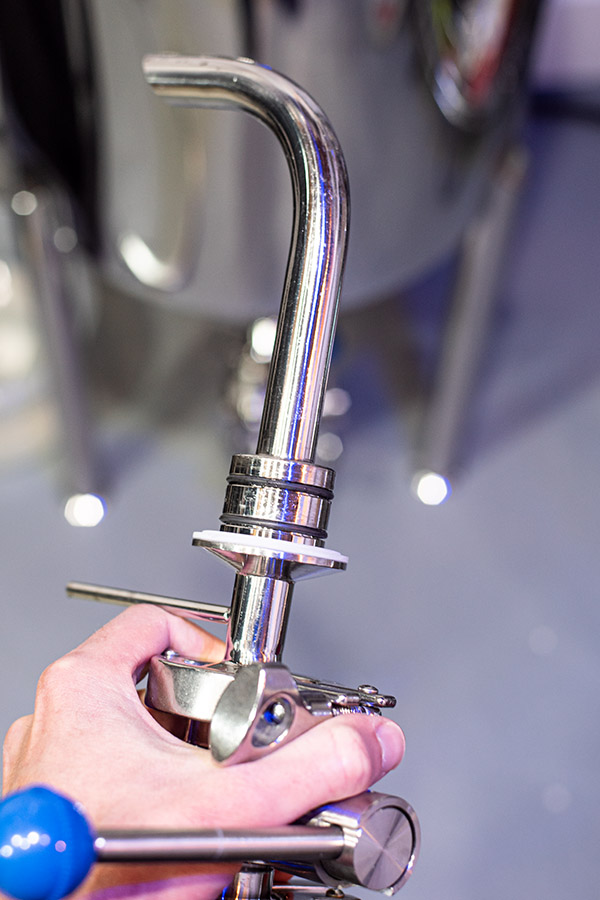

Being the first time I’ve ever used a racking arm of this caliber, I was pleased with the extra beer I was able to get from the cone. By my calculation, you’re looking at about 2 quarts of dead space from the racking arm tip to the end of the 90° elbow below the fermenter. Assuming you don’t dump too much trub, you really aren’t actually losing much (if any) beer at all.
Optional Upgrades and Accessories
I opted for a few specific upgrades when I purchased my tank.
- Upgrade Lid Clamp for Pressure Fermentation ($50): This adds a pressure rating of MAX 15 PSI on the tank, although BH recommends you keep it a little under. The upgrade consists of a two-piece clamp that bolts the lid in two spots. A 3/4 socket wrench makes this really easy.
- Tri-Clover Compatible Blow-off Arm ($150): A hefty all-stainless 90° blow-off arm. It’s pricy but honestly 100% worth it, especially since you have enough lid ports to leave it attached to the unit at all times. Depending on your usage, you may need to consider getting an extra butterfly valve to shut this port and or toggle between a barb for a blowoff and a TC gas post for pressurizing.
- Tri-Clover Compatible Sanitary Pressure Gauge 0-30 PSI ($45): I love that I can finally have a fixed gauge attached to the top of my tank for constant pressure readings.
- 1.5″ Tri-Clover Compatible Pressure Release Valve/Vacuum Breaker 15 PSI ($110): These are unique in that they act as both a PRV but will also prevent damage from creating a vacuum as related to pressure/temp drops in a sealed vessel! A must for pressure fermentation.
- Sampling valve ($20): Not included, but super useful to have.
- Ss Brewtech Spunding Valve ($177): Only accessory not offered by BH but figured I’d mention it.
- An additional 1.5 inch butterfly valve, 5/8 TC barb, and TC ball lock gas post are handy blowoff arm accessories. I also use a 3″ X 1.5″ TC reducer cap for my PRV and spray ball.

They do sell casters for this unit but I opted to forgo them. These tanks are really heavy and moving them, in general, makes me nervous.
Shipping Process
The delivery process is a little different for Brewer’s Hardware tanks. Since these are large and HEAVY (8 gallon is 80lbs) pieces of equipment, they’re shipped via FedEx freight. This means you will need to set up a scheduled delivery date and be present during the time of drop off. BH will notify you when they ship your tank and will give you detailed instructions on reporting any damages etc.
You’ll get a call within a few days from FedEx to schedule a delivery date. The driver will call you about an hour before they arrive to nail down a more specific timeline. Your tank will be shipped in a tightly packed wooden crate. I highly recommend you have a cordless drill at the ready on delivery day. You will be instructed by BH to unpack the tank and inspect for damages before signing ANYTHING. My driver was happy to hang out and wait while I did so. Ultimately Brewer’s Hardware was really informative in explaining this whole process ahead of time and left me with no surprises.
A hammer and small pry bar make for easy opening once the top is unscrewed. Just make sure you don’t go crazy and damage something.

Glycol Setup
The only aspect that required a bit of research on my end was the glycol setup. The tank is built with two 1/4 inch female NPT ports for glycol IN and OUT. I ended up opting for twist-lock glycol connections that easily snap in and out and seal to prevent glycol from spilling out. These are easily installed with PTFE tape and fit right into my existing glycol lines. I got two of these for my 3/8 ID glycol tubing and installed two of these on the tank itself. Easy peasy.

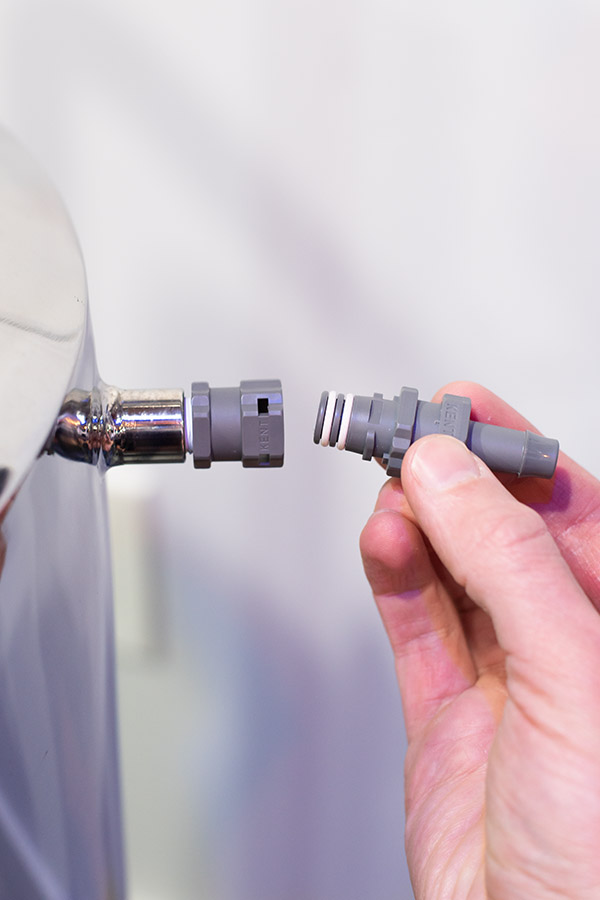
Just to note, glycol should be pumped into the bottom port of the tank and out of the top port. This ensures the jacket floods evenly and forces all the air out. If you go in the reverse direction you can get an airlock or catch a bubble and cause uneven chilling.
Using the Tank
My maiden batch was a pineapple-inspired DDH NEIPA. Everything went exceptionally smooth in terms of process. The thing that stuck out to me the most was the temperature control and cold crashing ability. I was able to easily control temps within a degree of my set temp. Thanks to the insulation, I can’t say my glycol system was cycling that often. This was par for the course however decreasing the tank’s temp to crashing levels is what I was most excited about. I was able to take the tank from 55°F to 34°F in under two hours. That’s faster than you’ll ever need and a massive difference from my cold crashing attempts with any other setup. The cooling surface area is that much larger and more efficient without worrying about frost buildup on a coil.
Another major benefit of the glycol jacket is the ability to quickly dial in yeast pitching temps. While I’d never fill my tank with hot wort, It’s nice to be able to fill it with 80-degree wort and quickly bring it down to pitching temps in 15 minutes or so. If anything this is a better approach so you don’t undershoot your target.
Don’t Sweat It

Brewer’s Hardware jacketed tanks are insulated with a 2-inch layer of foam so they won’t sweat in warmer environments. My basement is usually cool however it was actually a 90-degree day (and a little warm) when it came time to crash my pilot beer. The only visible sweat on the tank was around the top neck below the lid and on the racking arm. The rest of the tank was bone dry. No dripping, no puddles, no need for a neoprene jacket!
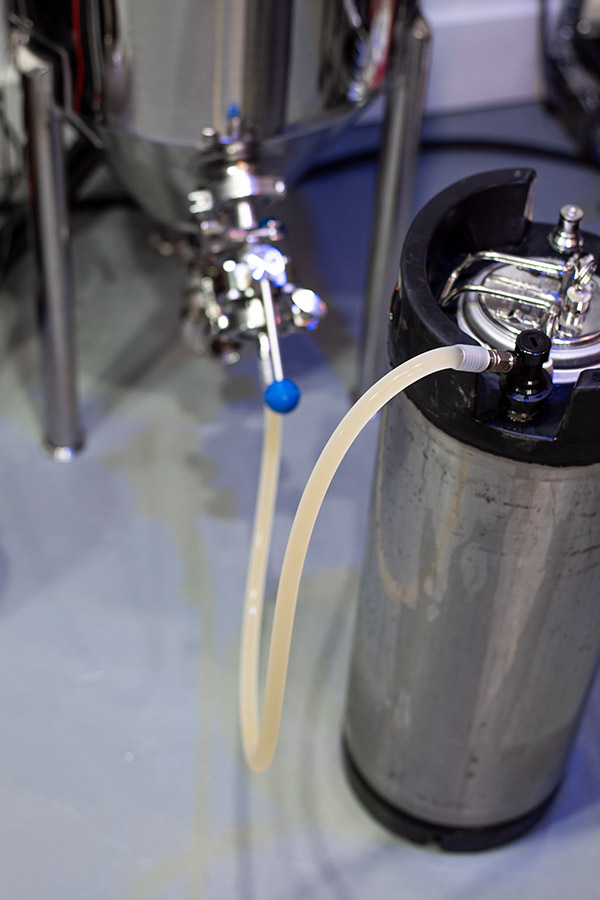
Closed Transfers
The fermenter comes with a 1/2 inch TC barb for transfers. I ended up buying 3/8 ID silicone tubing and an accompanying 1/2 inch swivel flare for my keg’s liquid quick disconnect so I could do closed pressure transfers. Everything fits snug so there is no need for any hose clamps (which I hate). This was my first time transferring with larger diameter tubing and WOW, does it make a huge difference. My semi-carbonated beer transferred flawlessly and in record time. One thousand times easier than my typical slow transfers with 3/16 tubing. While I probably should have devised this on my own months ago, I do appreciate Brewer’s Hardware nudging me in the right direction.


Downsides
Ok, it’s time to address the elephant in the room here…price. A fully kitted-out setup just like what I have pictured is going to run you around $1,800. Yikes. It’s certainly an expensive unit and simply not in the cards for everyone, especially at the 8-gallon scale. The good news is you can start out with a more basic configuration ($1,250) and add advanced components as you need.
I actually think it makes even more financial sense as you start to scale up into larger-sized tanks. There is certainly a premium on a small jacketed tank—probably a good reason why it’s the only one of its size and caliber. That being said, I still think it’s worth the investment based on pure quality, ease of use, and awesome performance.
My only other initial knock on this tank is the lack of extra body ports. One, in particular, that would be nice to have is a dedicated sampling valve. I ended up toggling my sampling valve to the racking port valve so it’s def not a deal-breaker. A tip with the racking arm is you can position it horizontally during fermentation so you can take samples from higher up in the cone. The 15, 20, and 30-gallon models have 2 additional body ports, and needless to say, I’m a little jealous.
While the mirror polish on the inside of my tank is pristine, the outside was very, very good. There are a few small spots where the legs meet the tank body where the level of polish isn’t as perfect. You have to look for these minor imperfections to notice them, but it’s my job to be critical!
Outside of that, the only other thing to really note is the pure depth of the jacketed wall requires you to disassemble the cone’s TC racking port since gunk likes to hide in there. I recommend doing an initial rinse/flush of the tank, cleaning behind the racking arm, and then start your CIP run to finish it off.
Final Thoughts
Overall, I absolutely love this tank. It’s beautiful, shiny as hell, looks awesome, and is really easy to clean. The mirror polish inside and out makes for really easy cleaning and best of all, no scrubbing! I had a pretty healthy krausen buildup after my pilot batch but a hot cycle of brewery wash left the tank good as new. I was actually really pretty impressed.
The lid assembly and general design make for a smooth surface with no hidden spaces for crud to hide. I’m perfectly confident CIP is all you need in between batches in terms of actual cleaning. This means less conical breakdown and real time savings. You simply cannot put a price tag on time savings in this day and age. I especially LOVE that I don’t have to worry about cleaning a cooling coil or dirtying a neoprene jacket. Without a coil/rod accessory, I always have a free 3-inch accessory port to mount my dry hopper setup. Just to note, Brewer’s Hardware also offers a premium dry hopper for purchase.
One last thing I’d like to mention is the quality of customer service at Brewer’s Hardware. Curtis was incredibly helpful along the way and is literally a phone call/email away. The fact that I can pick up the phone and easily get in touch with a human without jumping through hoops is not lost on me. They very much have a local business feel.
While the Brewer’s Hardware 8 gallon jacketed fermenter is certainly a pricy tank, it’s well worth the investment and doubles as a showpiece in my brewery. Pure performance, easy cleaning, and efficient workflow are what really set these tanks apart from the competition. It’s truly a commercial-grade fermenter at the homebrew scale. If I could have it my way, I’d have two of these tanks and nothing else!