
 by
by 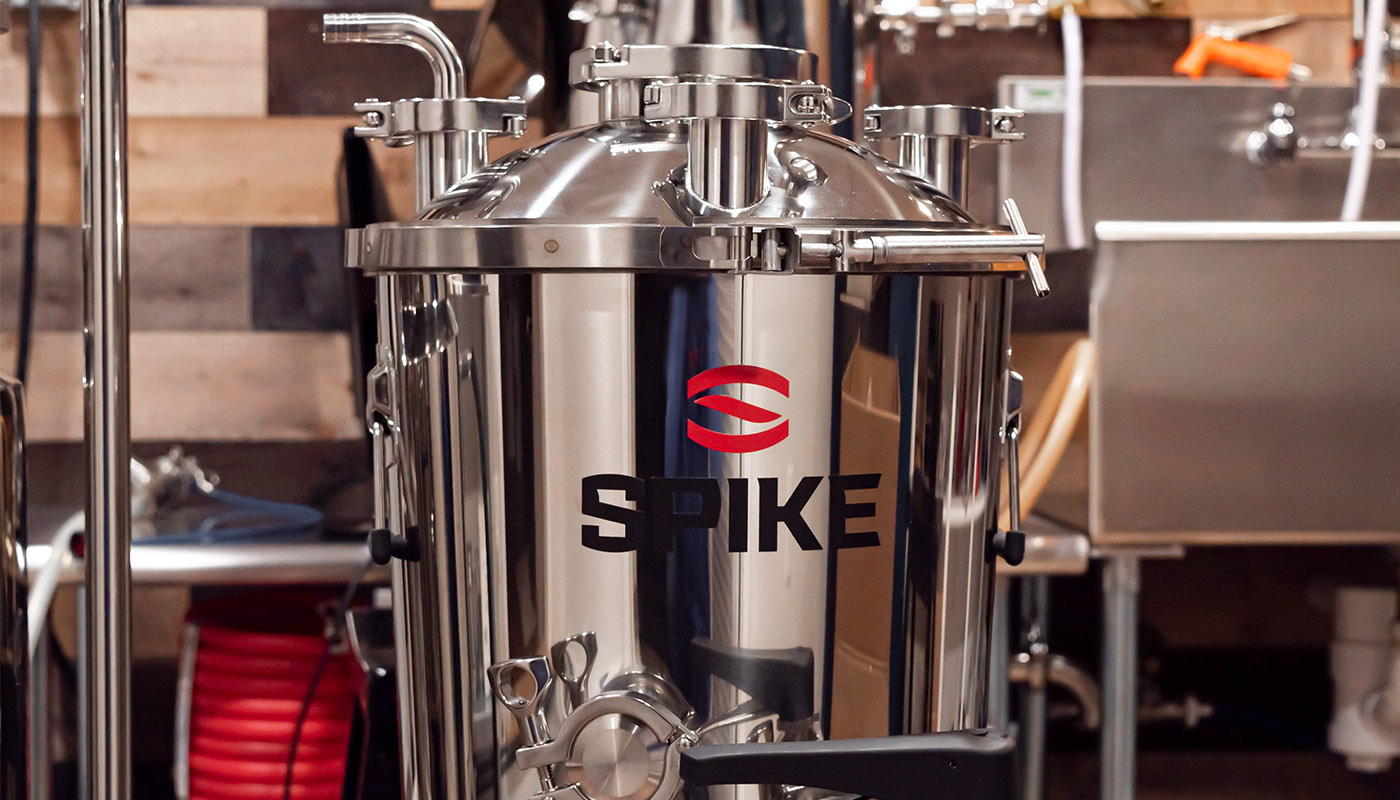
Spike Brewing loaned me the Flex/Flex+ fermenter for the purposes of this review.
I’ve wanted to get my hands on one of Spike’s Flex fermenters for a really long time. I’ve long admired their innovative products and focus on the homebrewing community. They’re one of the few full-service homebrew companies whose sole focus is on the homebrewing and nano community. I finally got the opportunity to ferment in a Flex fermenter while utilizing both the standard Flex ($265) and upgradable Flex+/components ($600). I’m going to highlight the features of each option and share the results of the “cold IPA” I piloted with the fermenter.
Product Overview
The Flex line of fermenters is unique because they’re essentially stainless steel bucket fermenters on steroids. The body of the Flex is basically the top portion of Spike’s true conicals. The design features a mirror-polished stainless steel body inside and out with 2 tri-clover ports (optional dedicated sample and transfer valve). Stainless steel is obviously superior from a cleaning and sanitization perspective and the tri-clover ports offer endless accessory options. I’m not a weldhead, but the welds and overall build quality of the fermenter are very nice.
My main draw to the Flex line is the upgradable nature and compact design. The Flex can ultimately be upgraded to do anything a sophisticated conical fermenter can do with the exception of trub dumping. The pictures directly below include everything the fermenter(s) ships with. Additional accessories are not included.


The Flex fermenters have a surprisingly deep cone for collecting trub, making transfers easier and beer loss minimal. Each fermenter comes with a racking arm that reaches into the cone. You can carefully rotate both versions of this by loosening the fermenter’s TC connection. The Flex comes with a 3-piece racking arm and NPT/TC adapter. The Flex+ features a 2-piece all-tri-clover arm with a butterfly valve.
Both fermenters come equipped with all gaskets, fittings, clamps, etc you need to ferment. The only other large difference between the two fermenters is the aforementioned butterfly valve versus NPT ball valve. NPT fittings are totally fine, but butterfly valves offer superior cleaning/sanitization. As an FYI, you may want to peak at their additional accessories for temp control, pressure fermentation, transfers, carbonation, etc. before finalizing your order. More on this later.


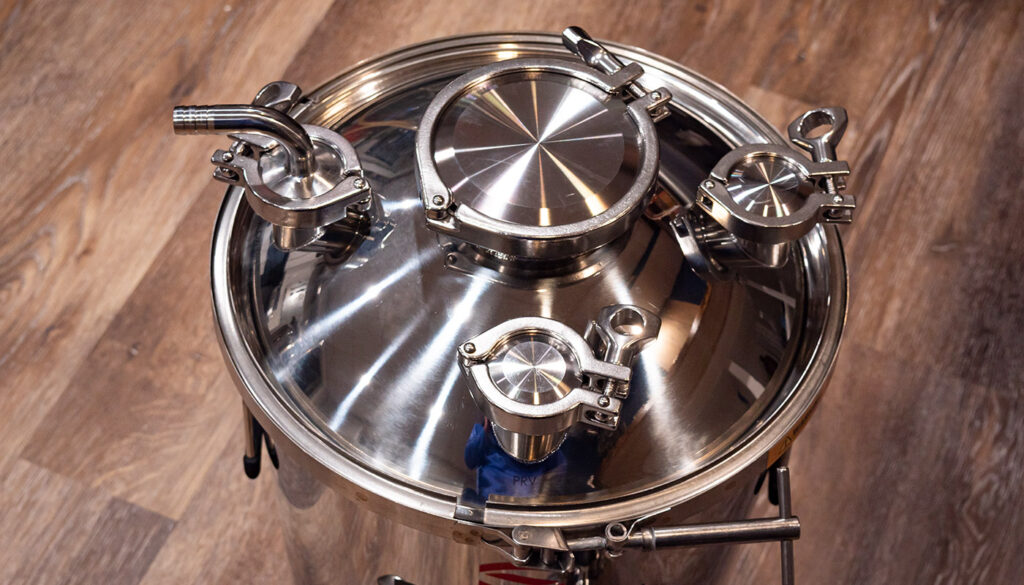
The Flex Lid
The big difference between the Flex and Flex+ is the lid. The upgradable 3 port Flex+ lid ($95) offers a 15 PSI-rated design and 3 tri-clover ports for accessories. If you’re interested in pressure fermentation, pressure transfers, advanced dry hopping, or carbonating, the Flex+ is the only way to go. Don’t underestimate the extra ports on the lid. Being able to connect a PRV, pressure gauge, or gas post is invaluable. I haven’t had a chance to use Spike’s new All-In-One PRV, but it also saves some real estate.

Using the Flex Fermenter
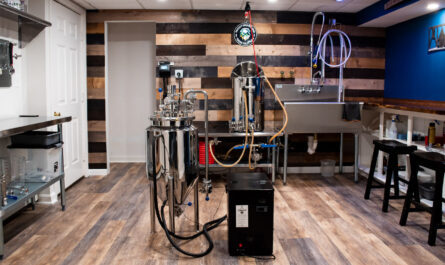
For the purpose of this review, I opted to use the Flex+ fermenter. My goal was to brew with my typical processes and identify any potential shortcomings. Getting the fermenter set up was really easy. I love the small design because it can be easily moved around for cleaning and sanitizing. While I love my full-sized conicals, I often miss the simplicity of cleaning and soaking my buckets in the sink.
My pilot batch was a newer beer style called a cold IPA. Cold IPAs are a mashup between a basic lager grist, a west coast IPA, and a New England IPA. If that makes zero sense then congratulations and welcome to the club.
Setting up the fermenter is really simple. The high-pressure lid features a lid clamp that must be hand tightened to fully seal the fermenter. After initially transferring my wort to the fermenter, I needed to bring the temp down to 65°F. Without any temp control (whoops), I was forced to throw the Flex in my fridge. Thank god for the compact design.

One thing I’ve learned about metal fermenters is their ability to retain temps better than plastic. My goal was to pitch at 65°F and let the temp naturally free rise. Since the entire fermenter was chilled and the metal was cold to the touch, it helped to keep the beer cooler for longer, despite the naturally increasing temperature. This is a huge benefit. I was able to monitor temp and progress with my Tilt.
The upgraded Flex+ 3 port lid gives you a lot of options and room for additional accessories (trust me, you will need them). I added my spunding valve, a blow-off/gas post, and a PRV. Unfortunately, the large center 4-inch port was unused solely because all my existing tri-clover parts are set up for 3-inch TCs or lower (dry hopper). There are lots of options here, I just tried to make do with what I already had on hand.
I don’t think I could live without a pressure-capable lid/fermenter at this point. Once you have it, it’s hard to go back. This all came in handy for dry hopping under pressure/spunding, cold crashing, and closed pressure transfers. You could honestly ferment and serve right from the fermenter if you have the components. Something I considered! Pressure and cold crashing are essential to avoiding oxygen suck-back during cold crashing. A must-have for IPAs.
As an aside, the standard Flex lid is surprisingly tight and forms a very tight seal. It’s far stronger than other lids that claim to hold 1-2 PSI for transfers.
Other Accessories to Consider
The Spike unit’s come with everything you need to ferment your beer. That being said, you’ll want to think about how you’re going to transfer your beer out when it’s time to package. Everyone’s processes and needs are very different, so it makes sense that Spike offers an a la cart approach to their products. I’m mentioning this because it may not be totally obvious that you’ll need some extra components to dial things in.
- Flex TC-100 Bundle (heating and cooling): For the purposes of this review, I fermented at ambient temps in a cool basement. If I was fully committing to this fermenter, I would have opted for the cooling coil so I could hook it up to my glycol system. This is one thing I wish I had thought through before starting this review. I ended up having to carefully move my fermenter from the floor to my fridge to initially chill before pitching and then again to cold crash. While everything worked out, I strongly urge against moving full fermenters.
- Closed Pressure Transfer Kit: I use a custom-built setup for pressure transfers however it’s not totally dissimilar to Spike’s package. This is another non-negotiable for me as it preserves your beer and also makes transfers simple. If you’re brewing NEIPAs, this is absolutely essential for non-oxidized beer.
- Gas Manifold or All-In-One PRV: You cannot safely pressurize any fermenter without one of these two items at a minimum.
- Sampling Valve: Perfect for pulling samples throughout fermentation. The sampling port on the Flex is higher up on the fermenter to avoid pulling trub.
- 3/4 ID silicone tubing for blow-off. If you’re using the pressure lid, you’ll need a tube to connect to the 90-degree barb. This can be swapped out for another accessory when you’re done fermenting. My only “complaint” about the supplied barb is the awkward tube placement. A downward-facing barb would make more sense. The standard Flex lid comes with an airlock and bung.

The Biggest Disadvantage with Bucket Fermenters
Elephant in the room—it’s very easy to spend a lot of money customizing a Flex fermenter. So much that it may start to make more sense to just bite the bullet and purchase a conical fermenter. While this is true, I think bucket fermenters still have their place in anyone’s brewery. By far the biggest “pitfall” with the Flex series is the lack of a dump port. While this is the only thing I really “missed” you can certainly live without it. These fermenters were designed for budget-conscious brewers and simplicity.
Larger and more complex equipment comes with a cost outside of the pure financial investment. Conical fermenters require more space, more moving parts, and are more cumbersome to clean. This is where a highly customizable, yet simple fermenter really shines.
Which Option Is Best For Me?
For every brewer looking for advanced features while saving on space and easier cleanup, the Spike Flex and Flex+ are really solid options. But which should you choose? If you’re serious about brewing NEIPAs/IPAs and sensitive styles of beer, I would say the Flex+ would be my overall budget pick outside of keg fermenting. For beginners, I could not recommend the entry-level Flex enough. It’s a great starting point to slowly add accessories as you get more advanced and demand more features. The $95 pressure lid upgrade is a gamechanger and a bargain for all it enables you to do.
I wish I had this fermenter when I first started brewing. It would have saved me a lot of aggravation and the constant need to totally upgrade. Luckily, Spike has made this a little more affordable to do without having to completely start over. I would not recommend any other fermenter in its class over it…and that’s the truth.


My buddy has that Cloud Pressure Transfer Kit and can’t stop raving about it
What is the “Cloud Pressure Transfer” kit?
If you don’t know you’ll never know
Yup, definitely going to bite the bullet on it now. Had the SS Brewtech bucket for years so it’s time for an upgrade since I can do pressure, spunding, etc. I enjoyed the SS product for probably 6-8 years and it was great for doing pressure transfers, but the ball valve was pretty small. Might have to build a small shelf in my mini fridge so the Flex+ fits fine, but no biggie. Pressure transfer kit is nice, but I pretty much have 99% of those parts already (just need that 1.5″ TC flare piece) .
Did you ever try pulling the trub out of the Flex by turning the dip tube? Theory is you should be able to get a good bit of it out, but certainly not all. Also would be neat to attempt serving from the fermenter as you mentioned.
I have a spike flex plus for awhile. Love it. Only thing I wish Spike would do is make racking arm with fine mesh screen to prevent dry hop pellets from get jammed when transferring beer. Or a floating dip tube that would attach to a 2” or the 4” triclamp openings. Hopefully Spike reads this response and does this to improve such an awesome ss fermenter.
I’ve gone the floating dip tube method before and personally, I’m not a fan… especially when it comes to beer loss. Look at Brew Built’s pressure transfer kit.
Perfect size for my space, just in time to replace our fermenter