
 by
by 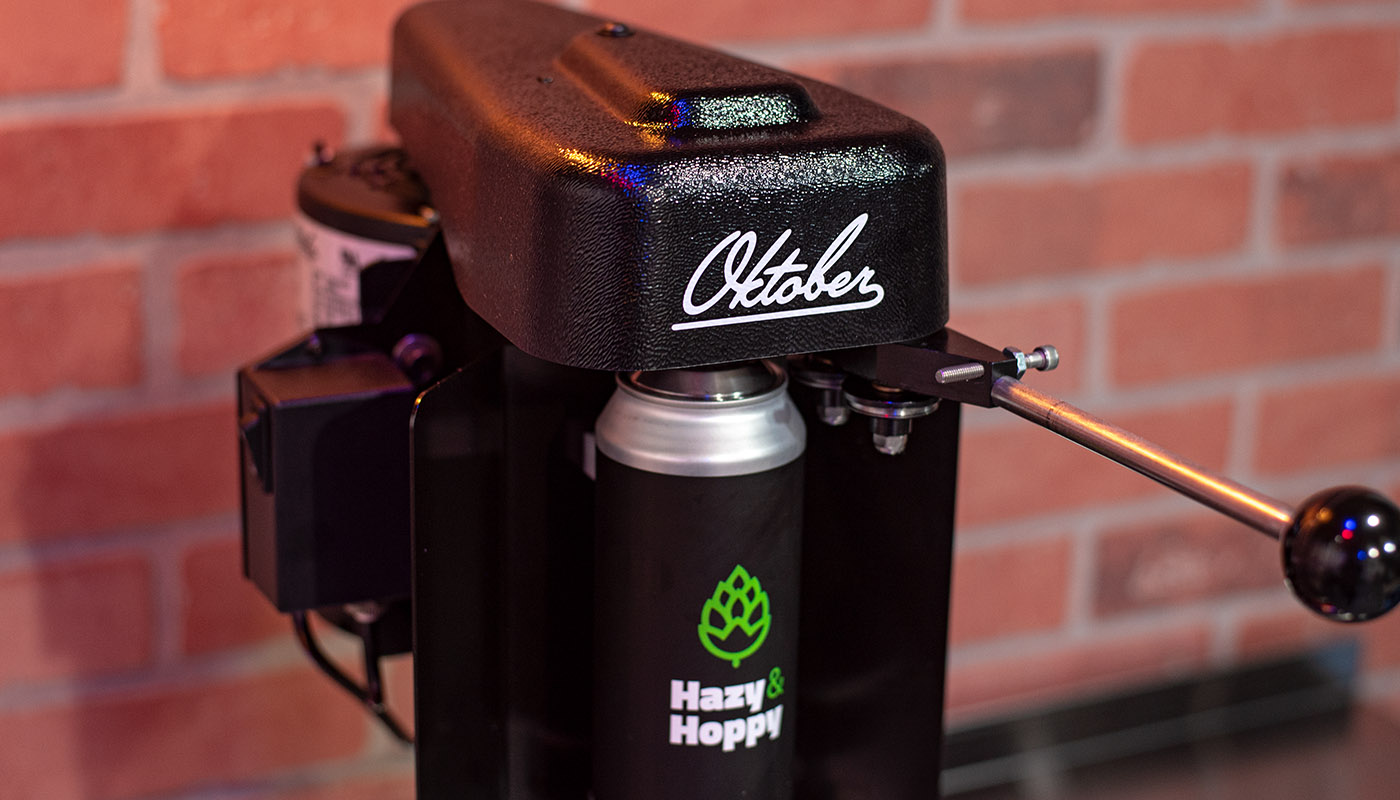
The Oktober SL1 and Blichmann BeerGun® were generously provided by Oktober Design and Blichmann Engineering in exchange for an honest review. The information below is my own unbiased opinion.
If you’re looking to start canning your homebrew like the pros then look no further than the Oktober SL1 Can Seamer, designed for homebrewers. 16-ounce cans have taken the craft beer world by storm. Bottles are no longer a pre-qualifier to high-quality beer. Cans are actually a better choice overall because they eliminate UV exposure to your precious pour. While bottles are reusable, cans travel better, they’re more compact, and won’t shatter.
Oktober Design offers both a commercial can seamer (Model 7) for small breweries and bars and a more affordable and simplified design for homebrewers (SL1). I was lucky enough to partner with Oktober for this hand’s-on review to offer a full overview of the product itself and the can seaming process.
Oktober SL1 Product Overview
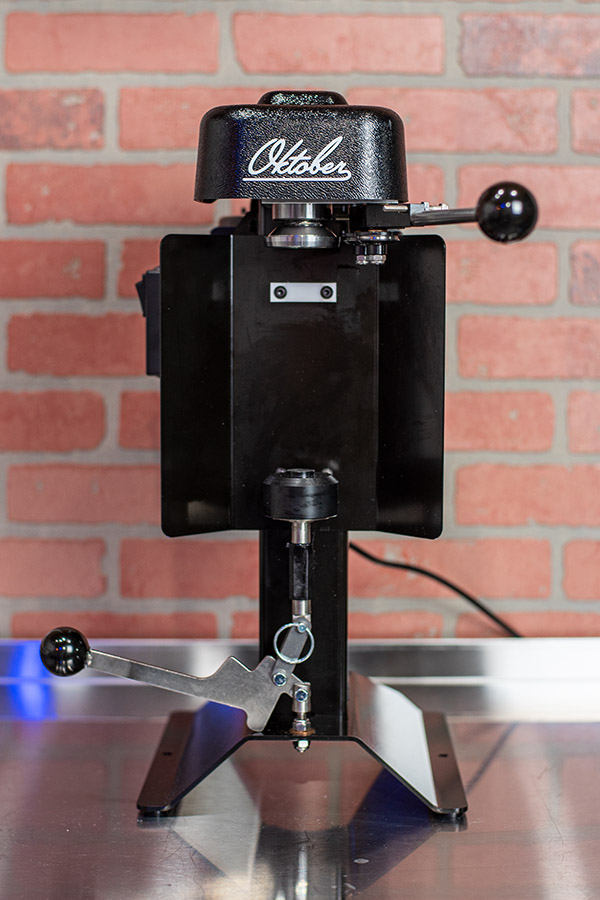
Right out of the box I was impressed with this piece of equipment. The SL1 honestly reminds me of my kitchen mixer. It’s very substantial and pretty heavy weighing in at 27 pounds (and I mean that in a good way). It just feels like a premium piece of equipment and really looks like one too.
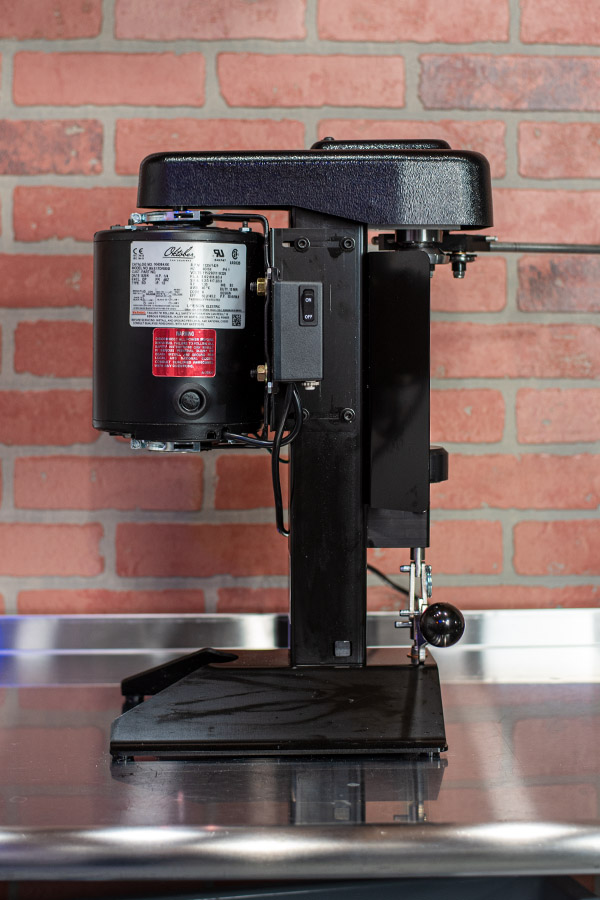

The SL1 comes well packaged and fully assembled with the exception of screwing in the seaming lever that ultimately crimps the lid to the can. The only thing to note here is that Oktober recommends you tighten the lever with a 7/16″ wrench so it doesn’t loosen and or strip over time from normal usage.

Tightening seamer arm 
12 ounce can adapter
The seamer is equipped with both 12 and 16 ounce can adapters that are easily removed/stacked for switching between 12 and 16-ounce cans on the fly. I’d say for most of us, this is all you really need to know outside of general maintenance. The learning curve on this machine is basically zero. It’s incredibly straightforward and really intuitive right out of the box. I’d recommend reading the manual but honestly, this video here offers a nice rundown on how to seam a can. And yes, it’s as easy as it looks. My first time seaming a test can was a simple success.
Custom Labeled Cans


Oktober also offers custom labeled cans through their very own printing service. Essentially you can design whatever you want (using a design template) and Oktober will print and deliver your cans professionally pre-labeled with high quality, slightly shiny labels. I created a really basic Hazy and Hoppy can design for this review and they came out AWESOME. It’s certainly a premium service but the quality blew me away and the time it saves is huge. I’d also like to mention the label material is like a plastic sticker that will not tear or fall apart when wet or soaked.
The only kicker with service is you’ll need to purchase a minimum of 3 boxes or 576 cans if using your own custom design. This will run you about $381 all in. I know it sounds pricy but it averages out to about $.67 per can. If you go this route I’d recommend a somewhat generic label with white space for filling in your beer’s name and ABV. The only other thing to keep in mind is having room to store the large boxes they arrive in. My cans arrived in great shape with the exception of a few that were dented during transit. The box itself feels a little thicker than your typical box.
If you’re on a budget, you can also opt for blank cans (192 cans for $76) and do your own labels OR use their stock “Drink Local” cans (192 cans for $117) as another option. The SL1 can also be set up for 8-ounce cans as well. Overall, it’s an awesome service and really impressed me. As an aside, there is no “online design tool” to create your labels so you’ll need to be a little design-savvy and use creative software (I used Adobe Illustrator).
Blichmann BeerGun

The Blichmann BeerGun® is a can/bottle filling device that allows you to fill bottles and cans directly from a corny keg. The unit features two triggers that allow you to easily purge receiving containers with CO2 and then fill them with beer. Blichmann generously provided me with their BeerGun (recommended by Oktober) in order to outline the can filling process.
Overall, the most cumbersome part of canning your own beer is the actual can filling part. This is where the most care and setup takes place as you’ll need to ensure everything is clean and sanitized. The good news is the Blichmann BeerGun, priced at $99, makes filling and purging cans really easy. The BeerGun offers everything you need to get started with the exception of a special fitting for your CO2 regulator.
Setup
I ended up buying a new gas valve with a 1/4 MFL flare to replace one of the gas valves on my dual regulator. This allows you to connect one gas post to your keg to maintain keg pressure along with a separate line direct to the BeerGun for purging cans. A dual regulator is best because Blichmann recommends you fill with 5-6 PSI and purge with 10-15 PSI. Another option is to buy a WYE splitter and add a 1/4 MFL flare to a single regulator. This will work, but you’ll have to both purge and fill at the same PSI.

Although it’s an investment, it probably makes sense to have a dedicated regulator for canning your beer, especially if you’re going to be doing it often.
Purging and Filling Cans with the BeerGun


The supplied BeerGun gas line is the shorter clear tubing with a 1/4 inch female flare on either end. This connects to the bottom flare on the BeerGun and then to the flare on the regulator. The longer thicker beer line has a liquid ball lock quick disconnect assembly on one end and nothing on the other end. The open end attaches to the top liquid tube on the BeerGun as depicted above. The quick disconnect attaches directly to your keg. I was originally thrown off because I’m used to gas lines typically being the thicker tubing.
- Once you’re all connected, set your keg-side regulator to about 6 PSI and the BeerGun regulator to 10 PSI.
- Position the BeerGun tip in the bottom of a sanitized can and purge for about 10 seconds using the push lever on the back of the BeerGun.
- Press the trigger on the BeerGun quickly to release the flow of beer. Fill until a small head of foam just creeps up above the full level of the can. The tip of the BeerGun should remain at the bottom of the can at all times.
- Immediately place a sanitized can lid onto the can, capping right on top of the foam. Beer should and will drip down the sides of the can if done properly. From here you’re ready to seam the can.
You can obviously fill cans right from your kegerator tap for quick cans on-demand or a day trip, but I wouldn’t recommend this approach for long-term shelf stability. You need to properly purge cans with CO2 to prevent oxidation and stale beer for longer storage.
Tips and Tricks

My canning setup can be seen in the picture above. I highly recommend you buy some plastic dish bins for soaking sanitized cans and lids before filling. In between cans, I’ll set my BeerGun in the sanitizer bin with my cans so it remains clean.
I have another bin dedicated to actually filling the cans. This is to catch the beer that ultimately overflows from the can you’re filling. Trust me, it prevents the table from becoming a mess. Lastly, after you seam your can, I’ll do a final dunk in a 3rd bin with sanitizer to rinse off any beer and sanitize the exterior one more time. I like to place finished cans on a dish towel to dry off.
If you have a pressurizable conical/unitank, you can also fill cans directly from your fermenter using the same process as outlined above. This is really only recommended for already carbonated beer. You would just need a tri-clover ball lock liquid post to attach to your fermenter.
Operating the SL1
The Oktober can seamer will seam your can in two swift motions. The only thing to mention here is you only need a 2-second count in each of the two lever positions to successfully seam a can. This process is much easier to explain visually so I put together this ultra-quick, no-frills video just to show how easy it is.
Downsides
I really have nothing bad to say about the Oktober can seamer. The only thing thing that honestly caught me by surprise (probably shouldn’t have) is that canning beer is a process and can be a messy job in general. The only thing I can pick on with the SL1 is the lack of a splash guard on the unit itself. A spinning can is going to spray a little beer once you start the rotating motor. Not from the beer inside the can itself but from the beer that inevitably drips down the can from the proper filling and seaming process. It’s honestly not a big issue, but something I noticed.
Oktober is aware of this and is evaluating adding a splash guard. In general, they were trying to keep costs down and create an affordable design that wasn’t too cost-prohibitive for homebrewers, which I respect.
I did want to mention a nuance with the BeerGun. There is a small groove on the filling tube that holds the trigger in place. For some reason, the trigger did not lock securely in place and it kept snapping loose, releasing the flow of beer. I mentioned to Blichmann and they were really quick to replace the unit for me as it appears I got a faulty one. My new BeerGun operates flawlessly and is night and day compared to the last one. I’m mentioning this because I really appreciate Blichmann’s support and their products always overdeliver.
Final Thoughts

Overall, I love the can filling process. Like bottling, it’s certainly a time commitment, but it’s well worth the flexibility and transportability of your homebrew. Once you get a hang of the setup and seaming of your cans, it actually moves pretty quickly. There is a natural rhythm and flow to it that feels second nature. I will say there is something peaceful about the entire process. Not sure what it is but running a can through an Oktober seamer just feels incredibly satisfying.
The Oktober SL1 Can Seamer is a phenomenal and well-built piece of equipment that’s easy to use. Priced at $879, it’s certainly an investment, but it’s absolutely money well spent. If I’ve learned anything about buying cheap tools or equipment, it’s that you’ll inevitably end up spending more when the first one breaks or doesn’t live up to expectations. There is nothing quite cooler than showing up to a BBQ with a 4 pack of professionally labeled and canned homebrewed beer. It certainly delivers the wow factor.
The only aspect that really required a bit of research on my end was the actual can-filling process. The BeerGun is easy to use once you get the hang of it but dialing in the CO2 and flow rate is something you just have to get a feel for. I would absolutely recommend a dedicated dual regulator for filling cans. The difference between 6-10 purging PSI feels really significant to me. More pressure is absolutely going to do a better job at ensuring minimal oxygen pickup, especially for very delicate styles like NEIPAs.
I recently sampled a NEIPA that had been sitting in a can in my fridge for 2 weeks. After opening, pouring, and tasting, I can’t say there are any obvious signs of degradation or oxidation. If there is, it’s very, very subtle. The beer still pours golden and hazy and tastes great.
On a final random note, I just have to mention I absolutely love the Oktober logo and brand name. My birthday is in October so it jumps out at me. The Oktober seamer really feels like a showpiece in my brewery and will make you feel like you actually know what you’re doing with this whole ‘I make beer‘ thing.

What type of can end did you go with? I was looking at these and wonder the pros and cons of the different ends.
I’m not sure TBH – I just went with the standard ends.
Hi Chuck,
I was doing some research on the Cannular versus SL1, and have found that B64 versus CDL (also referred to as 202)the biggest difference is availability. Industry uses CDL lids in high production, so seem like they’re more available and cheaper, at least in Canada. The lip profile is different is different on them, so the lids are not interchangeable. if you go to 3:11 of this video, you can see what i’m talking about https://www.youtube.com/watch?v=TWDn_a2wc7U
hope that helps,
Jaime
It helped when you mentioned that a can will stop UV exposure. My uncle mentioned to me last night that they are looking for a can seamer for faster production of their product and asked if I have any idea what is the best option to buy. Thanks to this informative article and I’ll be sure to tell him that he can consult a can seamer company as they can answer all his inquiries.