by
by 
Brewing water is a critical element in the beer brewing process. The composition of water can affect the taste, color, aroma, and mouthfeel of beer. One of the ways brewers can adjust their brewing water is by adding salts. Water chemistry is an incredibly complex beast. There are lots of technical resources out there that cover water chemistry in depth. This article is not that, because candidly, I’m not qualified to have those conversations.
What I can do is get you started in understanding the fundamentals of water chemistry as it applies to homebrewing. Below is an outline of how I got started with making water adjustments while tackling some of the questions and challenges I came across along the way. Before we get started, It’s important to understand a few basic primers.
Why Brewing Salts?
The use of brewing salts in beer production has a long history that dates back to the early days of brewing. Brewers in different regions of the world discovered that local water sources had a significant impact on the flavor and quality of the beer they produced. For example, brewers in the Burton-upon-Trent region of England found that the hard water in their area, which is rich in gypsum, best produced beers with a distinctive hoppy and bitter flavor.
Similarly, brewers in the Pilsen region of the Czech Republic discovered that the soft water in their area was ideal for producing the crisp, and refreshing pilsner style of beer. This led to the use of brewing salts, such as calcium carbonate, to replicate the Pilsen water profile.
Over time, these geographic regions have helped to define the mineral makeup of the beers we drink today. Certain concentrations of different minerals will deliver different results. To put it simply, the benefit of salt in beer is no different than salt in food. Without salt, a dish can taste bland despite using spices or fresh and flavorful ingredients. Once you add salt, all of those flavors just seem to pop.
Get a Water Report
Before we can make any sort of water adjustments to our brewing water, we need to understand the chemical makeup of our source water. Source water can be well water, city water, distilled water, RO/DI water, or spring water. Unless you’re brewing with distilled or RO/DI water, you will need to obtain a water report to know exactly what’s in your water. You can check with your city or town to get more information on your water, however, they may not have all of the information you need in the most digestible format.
The best option is to go to Ward Laboratories and get a dedicated water test kit. They will ship you a vial and you can send them back a sample of your water. Ward Labs will send you a detailed report with everything you need to know. If you’re lucky, you’ll have access to very soft water. This means the water is naturally low in mineral content, allowing you to easily adjust it with salt additions with more flexibility.
The main elements of focus are listed below. These are usually measured in parts per million (ppm).
- pH
- Sulphate (SO4)
- Chloride (Cl)
- Calcium (Ca)
- Magnesium (Mg)
- Sodium (Na)
- Bicarbonate (HCO3)
Here is an example of my own water report from Ward Labs:
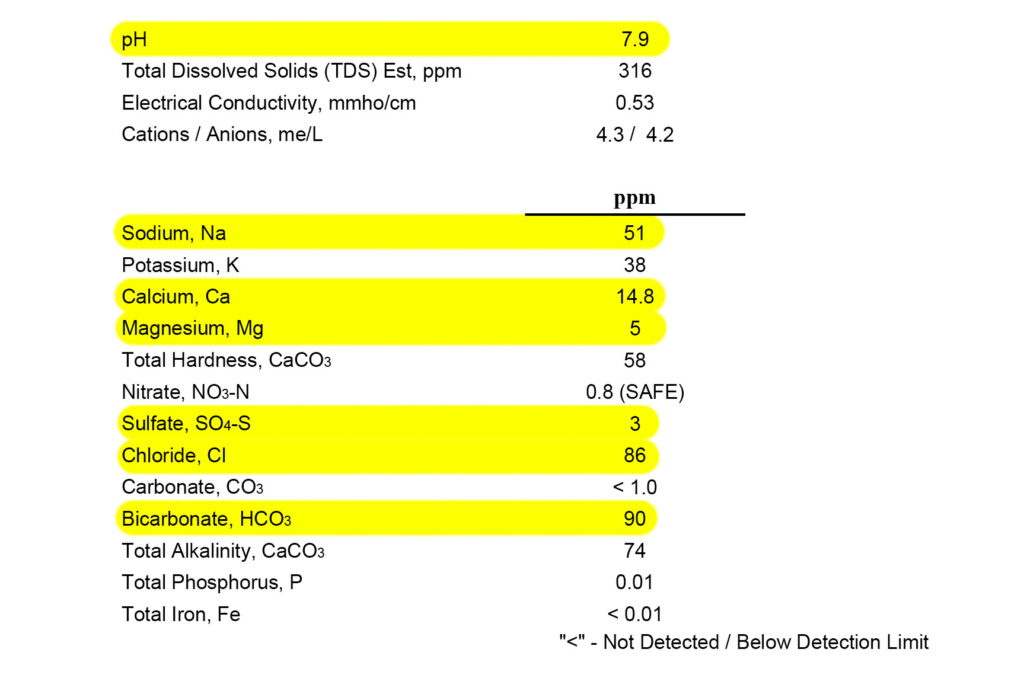
If your water source at home is very hard (high in mineral content), you will need to supplement and or strictly use distilled or RO. This will allow you to start with a softer or entirely clean slate to build upon. With the help of brewing software, you can dial in your water profile and make calculated adjustments easily. Below is a water report for my home. I’ve highlighted the most important minerals brewers care about.
The other option is to use RO/distilled water and assume a blank slate across the board. This can be an expensive option depending on how much you brew and how large the batches are. Making your own RO water at home produces a lot of wastewater. You can learn more about my RO system setup here.
I Thought RO and Distilled Water Were Bad for Brewing?
This is one of the most commonly misunderstood pieces of advice out there. It’s partially true but it does not tell the whole story. RO, RO/DI, and distilled water alone are less ideal for brewing. All of these sources are basically stripped of all mineral content via filtration or distillation and offer a completely blank water profile. If you brew with saltless water, you’ll never unlock your beer’s full potential.
RO, RO/DI, and distilled sources are fantastic starting points for building water profiles. With a completely clean slate, one will have limitless opportunities to recreate any water profile from the ground up without having to make any exceptions.
Treating for Chlorine/Chloramines
Chlorine and chloramine can produce chlorophenols in beer that contribute plastic-like or medicinal off-flavors. More delicate styles, such as NEIPAs are more susceptible to these types of off-favors. If your source water comes from a municipal source, it was likely treated with one or the other. I would strongly encourage you to treat your brewing water with Campden at an absolute minimum. Chlorine can be removed from water by simply letting it sit out for 24 hours or by pre-boiling it. Chloramines MUST be treated with Campden to remove.
If you filter your water with an RO or RO/DI system, you don’t need to worry about using Campden as those elements are already being stripped out via filtration.
Common Brewing Salts
Arguably the most common salts used in brewing are calcium sulfate (CaSO4), calcium chloride (CaCl2), and magnesium sulfate (MgSO4), also known as Epsom salt. These salts are added to the starting water or mash to adjust pH and mineral content.
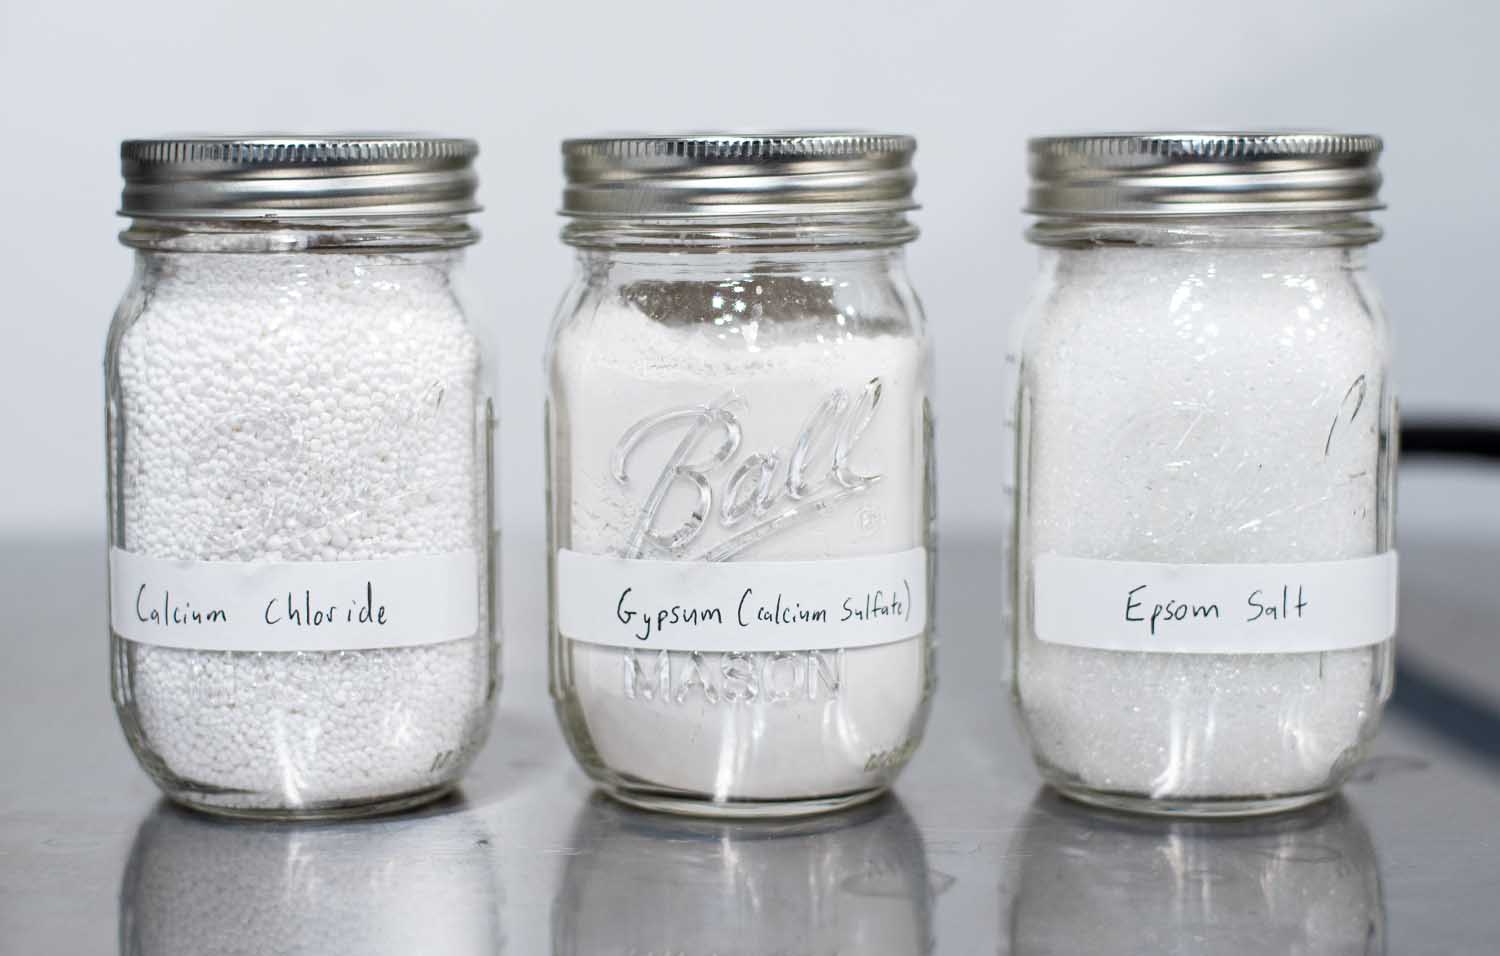
- Calcium sulfate, also known as gypsum, is used for beers that require a crisp, clean finish such as Pilsners and Lagers. The addition of calcium sulfate can also enhance hop bitterness in beer, which is why it is very important for American and West Coast IPAs.
- Calcium chloride is commonly used to deliver a maltier, fuller-bodied, and sweeter finish, which is important for Stouts and New England IPAs.
- Magnesium sulfate, also known as Epsom salt, is added to brewing water to increase sulfate and magnesium content. Magnesium is an essential mineral that plays a critical role in yeast metabolism. It helps promote healthy yeast growth and fermentation.
All three of these elements are typically used in conjunction to deliver very specific results. Depending on the style, more or less of each is used to create the right balance.
Other salts that brewers can add to their water include sodium bicarbonate (NaHCO3), sodium chloride (NaCl), and potassium chloride (KCl). Sodium bicarbonate can be used to increase the alkalinity of brewing water, which is important for brewing dark beers. Sodium chloride is used to increase the salt content of the water, which can enhance the beer’s mouthfeel. Potassium chloride can be used to adjust the pH of the water and enhance the beer’s fruitiness.
It is important to note that adding too much of any salt can negatively impact the flavor of the beer. Brewers should carefully calculate the appropriate amount of salts to add to their brewing water based on the desired water profile for the specific beer they are brewing.
Mash pH (All Grain Brewing)
You may be wondering how Mash pH comes into play with brewing water but it’s really important to understand the importance of pH and how it impacts mash performance. Mashing in the ideal pH range helps to promote better conversion, a cleaner finish, and a more balanced overall beer. If you make no pH adjustments, your pH is likely to be higher than the recommended range of 5.2-5.6.
Your grain bill and salt additions will have a direct impact on your overall mash pH. Grains contain various organic acids such as phytic acid, lactic acid, and tannins that can lower the pH of the mash when they are mixed with water during the brewing process. When the grains are soaked in water, these acids are released and begin to dissolve, resulting in an increase in the concentration of acid in the mash. This increase in acidity leads to a decrease in pH.
Most beers will require some level of additional pH adjustments depending on the style. Acid malt, lactic acid, and phosphoric acid are the most common methods of acidifying your mash. If you want to dive into more details on this, read this article on Mash pH.
Adjusting Water with Brewing Software
To get started with implementing water adjustments, you’re going to need brewing salts, brewing software, and a jewelry scale that measures grams. Here is the scale that I use. I also bought these calibration weights.
Below is a high-level step-by-step guide to getting started:
- Choose your brewing software: There are various options available, such as BeerSmith, Brewfather, Bru’n Water, and Brewer’s Friend. I use a combination of Brewfather and Bru’n Water because I’ve found Bru’n Water’s pH estimations to be the most accurate.
- Enter your water source profile: If using distilled or RO/DI, you can enter zero for all. Otherwise, refer to your water report.
- Select or enter the beer style’s target water profile: All popular software options will provide a variety of water profiles according to style. If you can’t find what you’re looking for, do an online search and you’ll likely find lots of options you can input manually. Bru’n Water and BeerSmith have several templates to choose from.
- Calculate the salt adjustments: Adjust the mineral content of your brewing water by manipulating the appropriate amounts of brewing salts. The software will help you determine how many grams of each addition are needed based on your inputs.
- Adjust the pH with acid: Brewing software will provide you with the estimated mash pH based on your salt additions and grain bill. Adjust your lactic acid quantities (usually in ml) or acid malt additions until your estimated pH falls in the range of 5.2-5.6.
I add all of my salts and any acid adjustments directly to my strike water. Since I brew in a bag with a full-volume mash, all salts, and lactic acid is calculated according to the full volume of my brewing water. Adding everything to your heated water before mashing in allows the salt and acid to easily dissolve and quickly mix.
Practical Example with Brewfather
The below figure illustrates what my process looks like in Brewfather. In this example, my starting source is 10 gallons of RO water, which is basically a clean slate. You can use the source profile below for your own RO water or assume zeros as a close enough estimate. Below the source water is an optional water dilution selector for supplementing distilled water or RO water. This comes in handy if using a mix of tap and or RO/distilled.
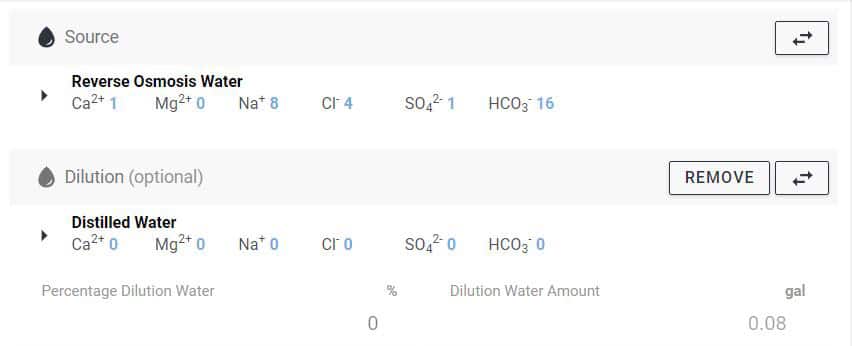
My target water profile, “hoppy NEIPA,” is a basic NEIPA profile with a 2:1 ratio of Chloride to Sulfate. Using the selectors next to each salt addition (you can’t see them unless you hover), you can adjust the amount of each salt addition in grams and see how it manipulates your mash and total water estimates. Your goal is to best match the target profile as closely as possible. Unfortunately, this is a manual process and there is no magic button to auto-optimize your salt additions.

In this example, I’m using a combo of 3 grams of Calcium Sulfate (Gypsum), 14.2 grams of Calcium Chloride, and 4.6 grams of Epsom salt. Epsom salt will increase Sulfate and Magnesium without impacting Calcium. Both Calcium Chloride and Calcium Sulfate will increase Calcium. It’s all a matter of balance. If I wanted to increase sodium further, I could calculate table salt additions to boost Na.
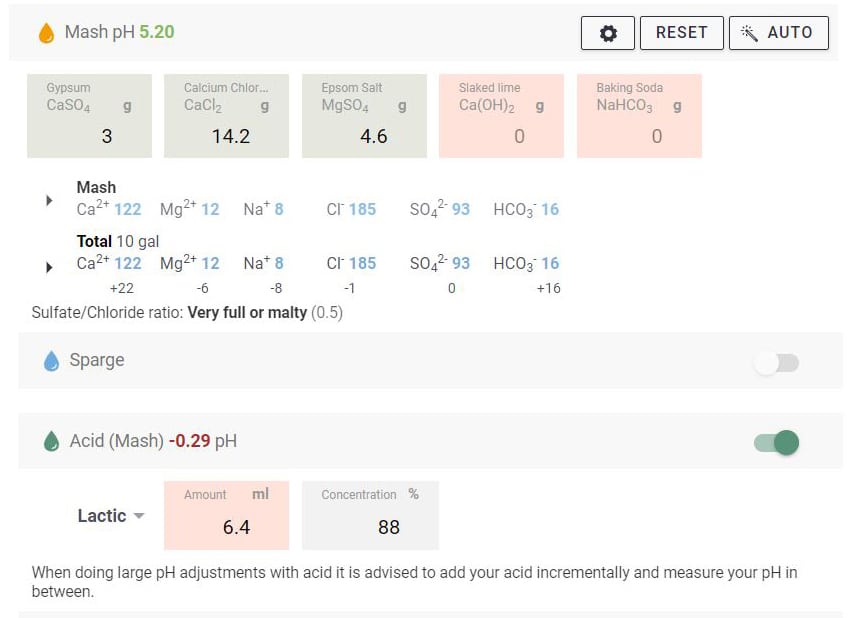
Lastly, you can see lactic acid additions at the very bottom of the calculator. Adjusting the lactic acid amount will change the estimated mash pH. In this example, 6.4ml was required to bring my mash pH down to 5.2.
If you refer back to my home’s tapwater test, you’ll notice my starting water has 86 ppm of Chloride. If using my tap water as the source in the same example above, I would probably require half the addition of Calcium Chloride to reach the same ppm. This is handy when brewing a NEIPA, but would limit me if I was brewing a West Coast IPA.
Final Thoughts
Overall, using brewing software to adjust water profiles is an efficient way to calculate the appropriate amounts of brewing salts needed to achieve the desired water profile for the beer style you are brewing. The most important thing is to start small and focus mainly on Chloride, Sulfate, and pH. As you get more comfortable, you can experiment with the other elements as well.
Explore the various brewing platforms out there and decide which works best for you. I’ve found the water adjustment process to be similar to the most popular options, however, they each have their nuances and differences. It’s all about what you’re the most comfortable with.