
 by
by 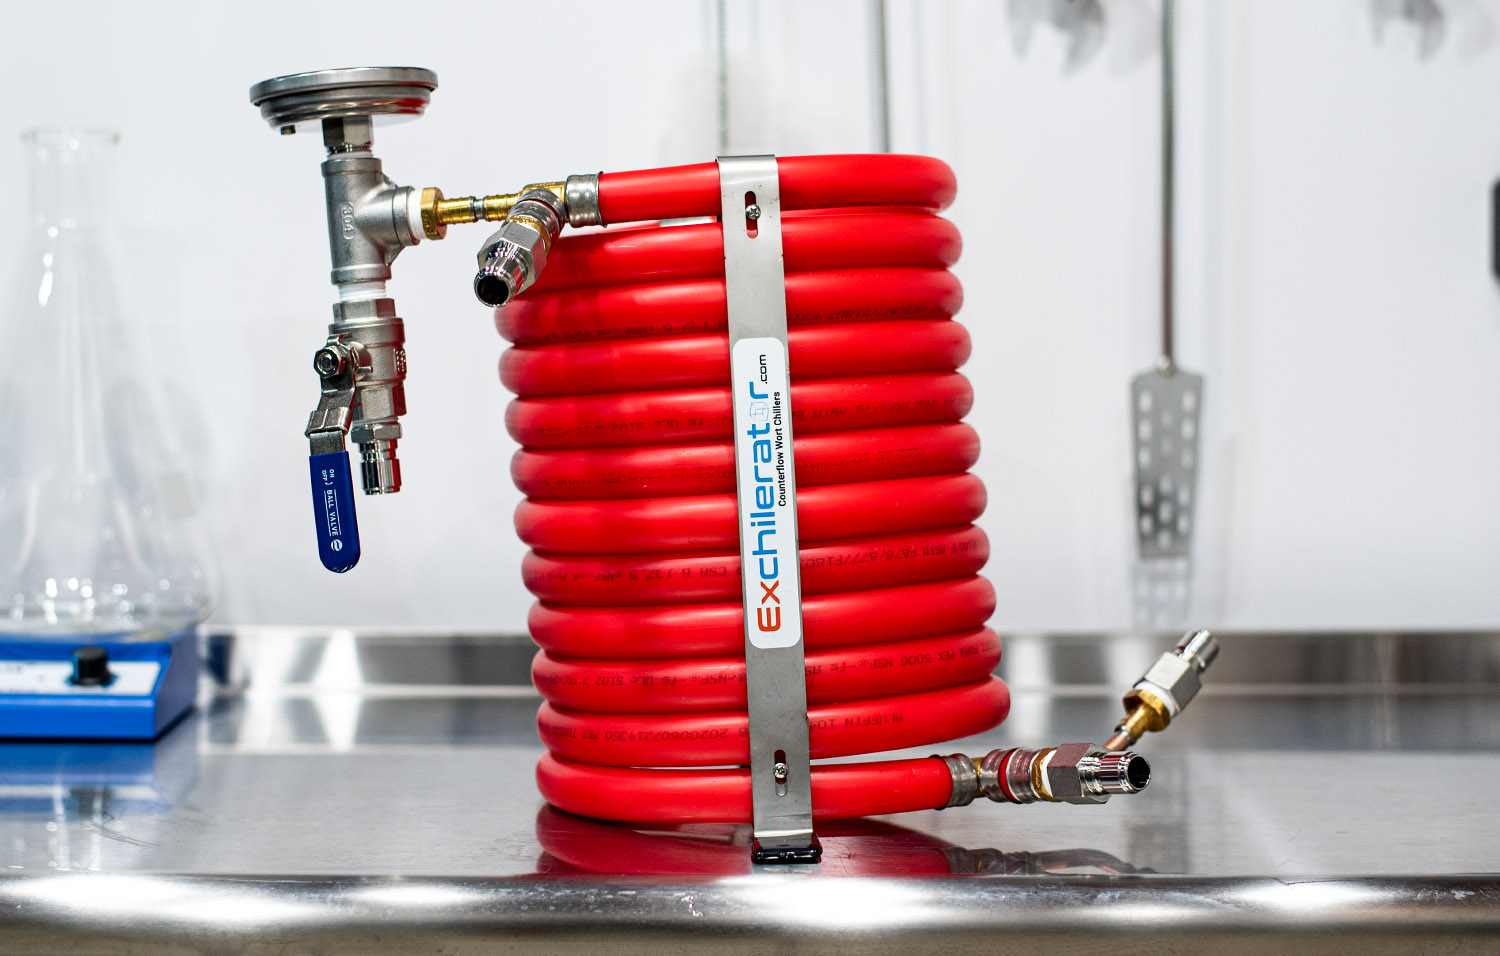
The Exchilerator Maxx Counterflow Wort Chiller was generously provided by Exchilerator in exchange for an honest review. The information below is my own unbiased opinion.
A counterflow chiller (CFC) is a popular homebrewing device for chilling down wort quickly post-boil. In addition to time savings, there is also an important benefit to cooling your wort down quickly. The risk of wild bacteria contaminating your wort is highest between 140°F-80°F. Long story short, you want to chill your wort down to 80°F as fast as possible to avoid anything spoiling your beer. Stalled beer in the cooling phase can also leave your beer with something called chill haze, which will lead to cloudier finished product.
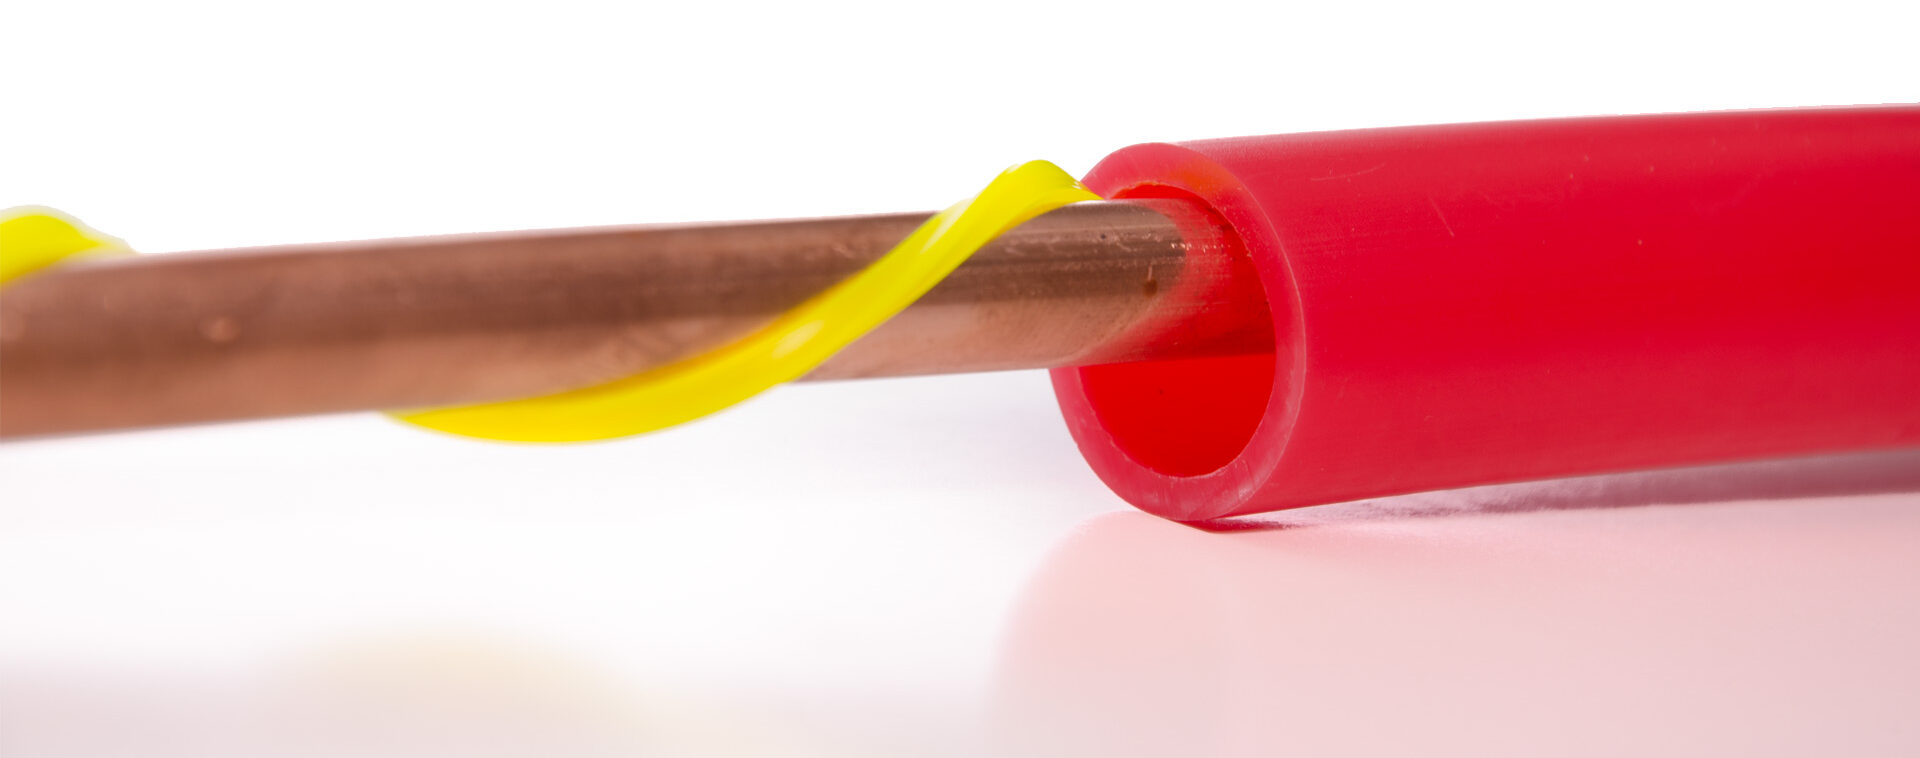
The typical design of a CFC is usually copper tubing housed within another tube. The outer tubing is fed with a cold water source flowing in one direction, while hot wort is pumped through the inner copper tubing in the opposite direction. The main benefit is efficient single-pass chilling from a rolling boil down to pitching temps. CFCs function similarly to a plate chiller but have a larger overall area for the wort to flow through. The benefit is the reduced risk of clogs from hops. The downside is they take up more space than a plate chiller.
The Problem With Immersion Chillers and Electric Brewing
Up until this point I had always used an immersion wort chiller because I was brewing with propane. It worked pretty well and I was happy with the overall simplicity. Once I switched to electric, things got a little more complicated. It’s difficult to use an immersion chiller with a ripple heating element. I personally do not feel comfortable setting a large immersion chiller on top of my element (I know some do this with no issue). I fear the extra weight over time could put stress on the ripple and damage it. I clipped my immersion chiller to the side of my kettle as an interim solution, however, an external chilling source is a better and simpler long term solution.
Product Overview
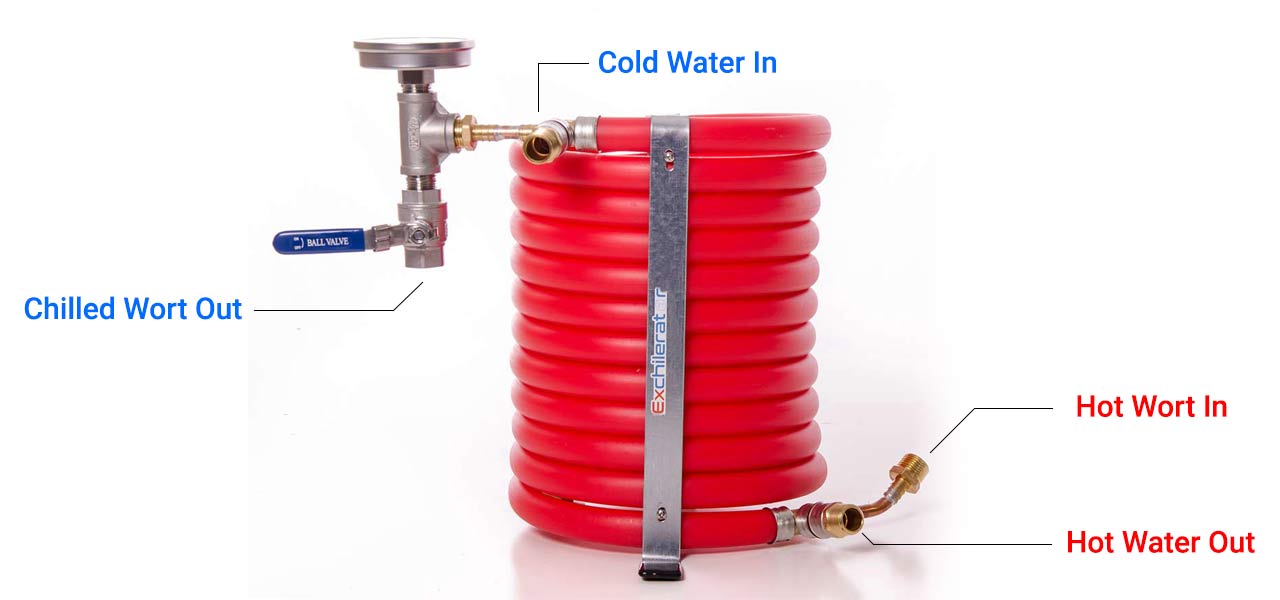
The Exchilerator Maxx Counterflow Wort Chiller is a beast of a unit featuring 25 feet of co-helical wrapped copper tubing encased in their exclusive PEX shell. Exchilerator claims their wort chiller can cool up to 10 gallons of boiling wort to pitching temps in less than 5 minutes! I received the “Ready To Brew” package which includes a stainless ball valve and thermometer to monitor temp and control the flow of wort as it’s exiting the chiller, which is a really convenient feature.
The Exchilerator’s design features a unique helical wrapping around the internal copper tubing causes the cooling water to tumble, providing the maximum surface contact possible as your wort flows through it. Thanks to the smoothbore copper tubing, it’s a class above and very easy to clean with minimal risk of wort and bacteria lurking in small spaces. Plus, it won’t chew up your wort as you’ll only lose about half a pint to the chiller.

First Impressions
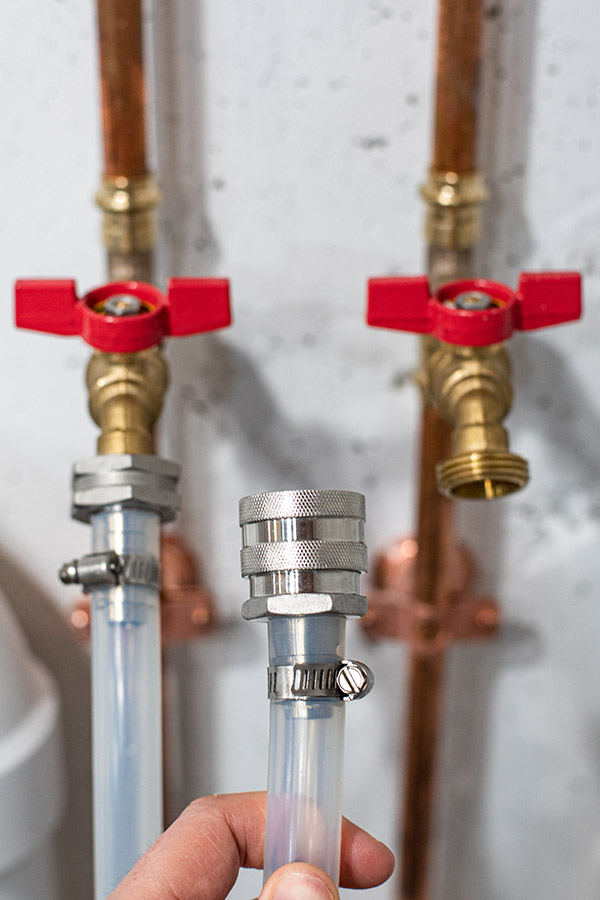
Right out of the nicely packaged box, The Exchilerator Maxx feels like a solid unit that is well built and really heavy-duty. I get the sense I could drop the thing and no harm would come of it. Not to mention the red design is pretty sweet and it just looks cool with my setup. I rigged mine up with 4 male stainless quick disconnects which screwed onto the 4 1/2 inch threaded NPT fittings which made integration into my setup really easy.
My plumbers installed hot and cold garden hose access in my basement which makes for easy water access to the chiller. It’s worth noting that the end of my tubing/hose has a female quick disconnect (QD) for easy connecting to the chiller and kettles.
Other Options Available
The Exchilerator can be customized to easily fit into your brewing system and overall preferences. The inputs/outputs can be equipped with Tri-clamp (TC) fittings and you also have an option to choose a stainless steel inner coil instead of the standard copper. Just note the stainless option will have a cooling rate of about 25% slower.
Assembling the Chiller
It’s really important to assemble your chiller the correct way for the best results. The wort and water MUST flow in opposite directions for the most efficient cooling. Like any chilling unit, if the water and wort flow in the same direction, the unit will not function properly, this also goes for immersion and plate chillers. You’ll need to use PTFE tape on all threads to ensure a liquid-tight seal. My chiller was shipped with a whole roll, which I found to be a nice touch.
Putting It to the Test
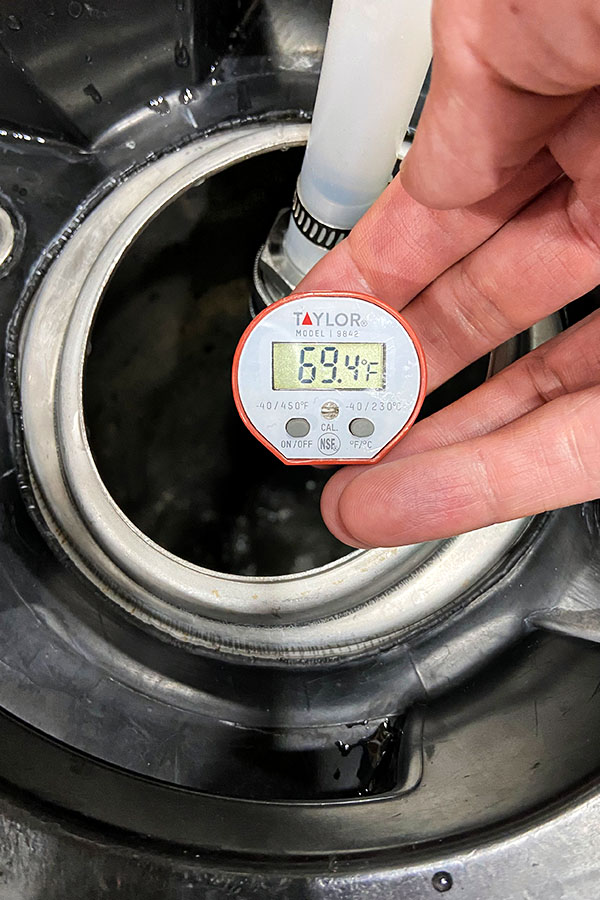
I conducted two tests with the Exchilerator Maxx. First, I did a hot water test as a trial run so I could familiarize myself with using the CFC AND so I could test the chilling capabilities starting with boiling water. My pilot batch for officially using the CFC was going to be a NEIPA, so I knew I would be whirlpooling at a lower temp to start with. I measured my groundwater temp beforehand, which was 57°F.
Boiling Water Test (212°F)
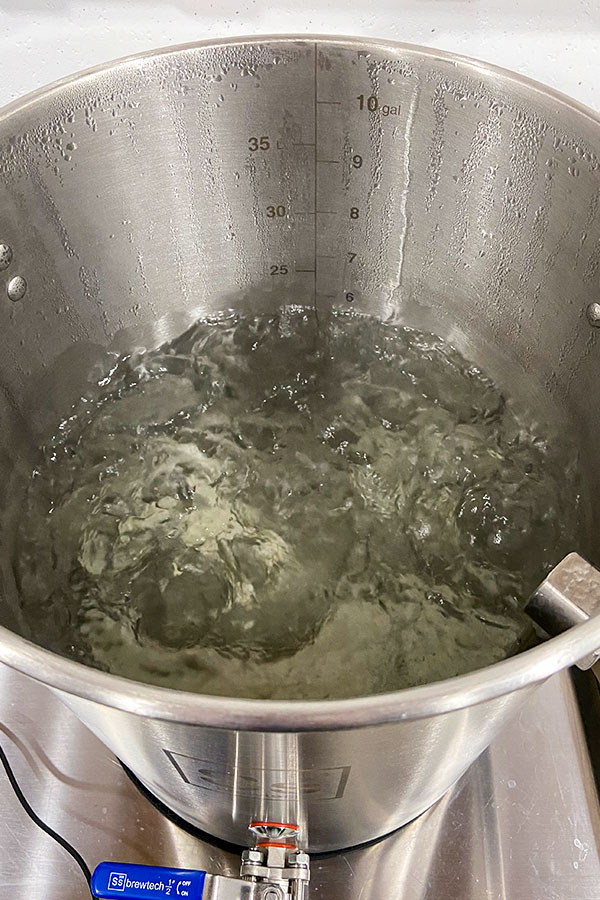
I brought 5 gallons of water to a strong rolling boil, removed the lid from the kettle, and immediately started the flow from the cold water source (This water source was 66°F). I then started pumping in my test wort (water) through the CFC. Time to cool from boil (210°F) down to about 70°F was 5:15. I could have absolutely gotten my test wort temp down even lower by decreasing the flow further. My ground water was on the warmer side during trials so I had to dial the flow back to make up for a less efficient cooling. Cooler ground water would have enabled me to run the pump faster, decreasing cooling time to under 5 minutes.
NEIPA Brew Day Post Whirlpool (170°F)
On brew day, I decided to push the Exchilerator’s limits a little more by increasing my cooling water usage in order to see how quickly I could chill my batch. My 4-gallon NEIPA consisted of a 3.5-ounce whirlpool hop addition for about 30 minutes at around 170°F. I actually used the Exchilerator to bring my wort down to whirlpooling temps. This took about 20 seconds and a few cycles (if that) to do.
The time to cool 4 gallons from 170°F down to about 68°F-70°F in a single pass was 3 minutes and 35 seconds! I still think I could have actually done this quicker with a little practice dialing in the flow etc. Overall, that’s incredibly fast chilling and probably overkill for my purposes.
Cleaning
My biggest hesitancy with any external wort chiller was cleaning concerns. It wasn’t until I used the Exchilerator that I realized some of the major cleaning benefits of an external chiller. CFCs have a larger surface area for the wort to pass through. This puts the Exchilerator at an advantage over a plate chiller. The risks of hops or wort particles getting clogged or stuck on small spaces are greatly reduced.
When I’m done chilling I Immediately flush the chiller with hot water. Since I have hot water access via garden hose equipped with a QD, it makes this process as easy as swapping the QD’s and hooking up to my hot water (I highly recommend anyone consider this for your brewery when setting up!). This can also be done with a cold water supply. Doing an immediate flush is going to eliminate most if not all residue left behind. For a deeper clean, I run my chiller inline with my pumps and the rest of my equipment with Exchilerator’s new Brewery Wash solution. Since this is already part of my pump/tubing cleaning process, it adds no additional cleaning effort.
Tips On Using
You’ll notice in my video I’m tweaking the valves on the chiller and pump to adjust the temperature. Once you get this dialed in it stays pretty stable. I was a little frantic because I was trying to film and control the chiller flow at the same time. The higher the water flow rate, the lower the output wort temp. The lower the wort flow rate, the lower the output wort temp. I would start by throttling your pump way down and slowly increase the flow based on the wort temperature OUT. The Exchilerator has a built-in thermometer for monitoring wort temp, I just used a digital thermometer for the sake of the video and ease of showing temp.
Final Thoughts
From boiling to pitching in 5 minutes? Yeah, that was my biggest takeaway. After growing accustomed to 20-30 minute cooling sessions, the Exchilerator left me feeling like I was forgetting a step…
The Exchilerator is an awesome piece of equipment starting at $195 without any accessories. It’s durable, easy to clean and store, easy to use, and chills wort down incredibly fast. The biggest tradeoff with faster chilling is of course excess water usage. The good news is you can easily recycle the water for cleaning and sanitizing equipment later. I can run the Exchilerator for 4 minutes or my immersion chiller for 15-20. It’s also one less thing I have to submerge in the kettle which is a great benefit, especially for electric brewing. The thought of clogging this thing, especially with a hoppy NEIPA, never even crossed my mind.
Overall I would absolutely recommend the Exchilerator. It’s a nicely built piece of equipment and a great addition to any brewery.


For maximum efficiency use maximum flow of cooling water available. The efficiency that is maximized is shortest cooling TIME – – NOT efficiency of cooling water used.
Same for wort, pump the wort through the CFC as fast as you can. This assumes you can return the wort back into your boil kettle and recirculate the wort through the CFC multiple times.