
 by
by 
The Unitank 2.0 by Ss Brewtech is a state-of-the-art fermenter that builds on their original unitank design. The original Ss unitank was one of the first fully functioning unitanks to hit the homebrewing market. Earlier this year, Ss Brewtech released an improved version of the same fermenter featuring a glycol jacket for temperature control, replacing the old cooling coil design.
The glycol jacket is slowly becoming the gold standard for fermenter temperature control in homebrewing. While this has been the norm in commercial equipment for decades, submersible coils are much more affordable. While cooling coils work, they’re more difficult to clean, less efficient, and eat up valuable real estate on the fermenter’s largest lid port. Let’s dive into the new Ss fermenter and see how it stacks up against the rest.
Product Overview


The Unitank 2.0 is a fully functioning unitank with pro-level capabilities. The fermenter comes stocked with everything you need to ferment and carbonate your beer in a single vessel. The polished finish is beautiful inside and out with high-quality components and a neatly organized layout. The Unitank 2.0 comes in 7g, 14g, 17g, and 31g (1bbl) sizes. Today I’ll be specifically reviewing the 7-gallon model.
The overall body design is nearly identical to the original unitank but with a few minor changes. The carb stone is now located on the right side of the fermenter rather than the left. The thermowell is now located on the right back side as opposed to the front. This is much better as it keeps the probe cord out of the way.
One of the most interesting components of this tank is the non-metal racking arm. The racking arm has a special design that actually inserts and locks into the butterfly valve and doubles as a TC gasket. This gives you the ability to rotate the arm with the butterfly valve and always know how the valve/arm is positioned. All of my other fermenters use a stainless component here, however, it works just as well and its flexible nature makes it easier to insert and remove without scratching the inside of the fermenter.
Glycol Jacket
A jacketed fermenter is not a fermenter with a neoprene jacket. These are two entirely different functions. A glycol jacket is an enclosed chamber carrying temperature-controlled glycol and water. The chamber surrounds the inner wall of the fermenter, greatly improving heat exchange and eliminating the need for internal cooling coils. Glycol jackets are much more efficient in terms of temperature control than coils.
The glycol jacket on the Ss unit wraps around 50% of the bottom portion of the cylindrical body of the fermenter (excluding the cone). The 1bbl Unitank 2.0 fermenter follows the same “half jacket” design, whereas their pro “Jacketed Unitank” features a fully jacketed cooling system that extends from the top of the fermenter deep into the cone. For reference, the difference in price between the two 1bbl units is about $1600.
Why am I telling you this? I think it’s important to differentiate and understand how these fermenters function compared to commercial fermenters. Also, a full jacket would nearly double the cost of the unit, creating a steep price barrier for most hobbyists. At the homebrewing scale, this seems like a nice tradeoff that is still highly functional and an improvement on the previous coil design without totally breaking the bank. In my trials, I’ve found partial jackets to be just as effective as full jackets, they just take a little longer to cold crash.
Unboxing
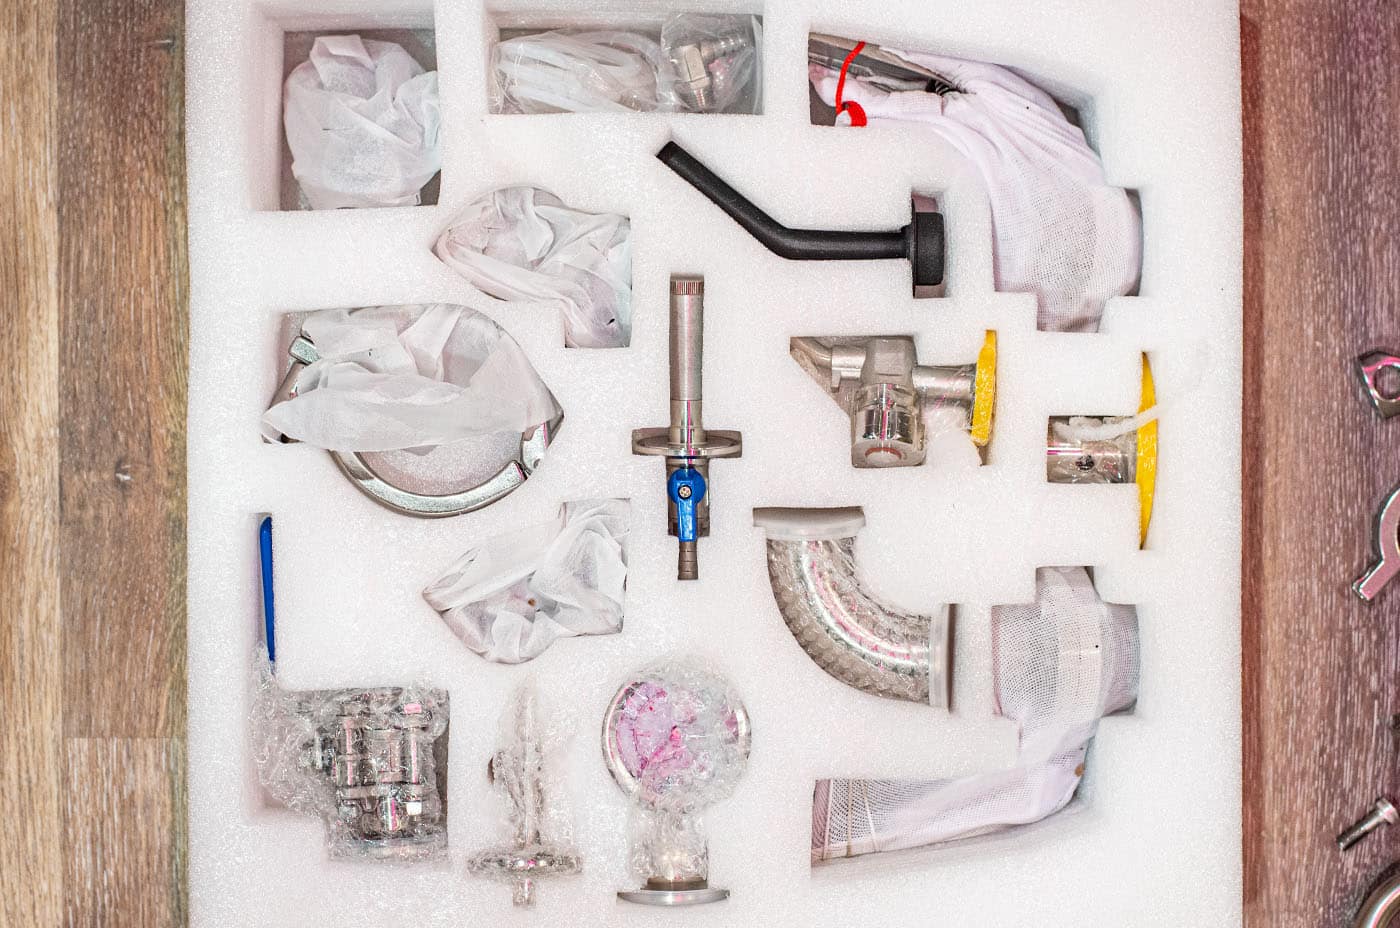
Unboxing the Unitank 2.0 was very simple. The beauty of this fermenter is how small and lightweight it is. The 7-gallon fermenter can be easily moved by one person. All of the accessories you will ultimately need are included in the box in a foam package, making this a foolproof shopping experience without the need for bundling lots of additional accessories.
My absolute favorite part of this fermenter is the top lid construction. I’m a huge fan of large TC lid caps that can be easily opened and closed. TC lids are far superior because they’re much easier to seal and less likely to leak. While you don’t have full access to the inside of the fermenter, you still have a large 8-inch opening. I’ll take this tradeoff any day.
The 7-gallon version is so much smaller than I imagined. You could easily fit 3-4 of these in a very small space with no issues.
Using the Fermenter
Setting up the unitank is fairly simple. Every accessory has a dedicated port so it only takes a few minutes. Outside of accessories, the only assembly consists of attaching the bottom support brace and leg levelers. Once the neoprene jacket is on, you’re ready to add all accessories.
I started my journey by cleaning the fermenter with a CIP loop with Exchilerator Brewery wash. I always recommend this prior to sanitizing new equipment. Even though it’s brand new, it’s important to clean it to remove any dust, grease, or residue from manufacturing. Once the yeast was pitched I was off fermenting with no issues 24 hours later. Fermentation temp control was spot on as expected.
The biggest test with this fermenter was the cold-crushing ability. Outside of pure functionality, this is one of my biggest requirements when it comes to brewing heavily dry-hopped beers. An adequate crash to 35 degrees Fahrenheit ensures all trub, hops, and yeast settle out to the bottom of the fermenter for easy transfers and clean-tasting beer.
I was able to get my 6-gallon batch down to 35 degrees F (2.5 Celcius) in about 4-5 hours. I’m actually incredibly impressed with this cooling performance. It’s much faster than a cooling coil and likely has a greater cooling capacity. If you’re someone who is skeptical of the partial jacketed design, I’m here to confirm it works incredibly well. I’m assuming the placement of the internal jacket is very intentional. Cooler wort likely falls into the cone where it’s less likely to need constant cooling, unlike the top where warmer wort will actually rise.


There are a few small details I really like about this fermenter:
- The glycol ports come with two 90-degree elbow barb connections that easily connect to standard glycol tubing. No need to get additional accessories here other than clamps.
- The carb stone and thermowell are included with the unit.
- The pressure gauge sits on the blowoff arm, removing it from the top of the fermenter. I actually really like the simple design of the top.
- There are no other lid ports on the 7g fermenter other than the top 4-inch PRV/cap. Without the cooling coil, you now have a large lid to add dry hop or install a larger dry hopping accessory if you want.
- The legs have levelers so you don’t have to worry about your surface being perfectly flat.


Additional Accessories to Consider
Ss Brewtech offers a few other accessories you may want to consider. Depending on what glycol unit you have, you may want to look into the FTSs Touch package. It’s not cheap but it gives you everything you need to both heat and cool your beer except for the glycol chiller itself. My glycol chiller (not Ss) has built-in pumps and temp probes so I do not need any additional probes or external controllers.
One major plus to partially jacketed tanks is the ability to add an external heating pad on the cone. You can’t do this with a fully jacketed tank unless you have the ability to actually heat your glycol. It’s simply not functional in most cases.
You may want to look into the Essential Kit for figuring out transfers, dumping, etc. At a minimum, I highly recommend this hose barb to attach a submersible hose to the end of the blowoff arm/ball valve. I already have my own transfer hoses etc. so I was able to make do.
Lastly, if you’re going to pressurize this vessel, you will need a 1.5 TC gas post accessory. I’m surprised this is not included with the Essential Kit. You will need this for pressure transfers and pressuring the vessel in general. You can attach this by removing the ball valve on the blowoff cane and replacing it with the gas post or you could build it off a micro T valve just above the ball valve.
A word of caution, this should only be done in conjunction with a spunding value during active fermentation or alone only after fermentation is completed. Just to note, the 14g models and up have an additional TC port on the top of the fermenter.
Downsides
I don’t see any issues with this fermenter however there is one aspect that I think could be slightly improved. The carb stone accessory features a hose barb for connecting standard gas tubing. While this absolutely works, it’s not the most convenient setup when it comes to connecting/disconnecting a CO2 tank.
Most of us are constantly shuffling tanks around between fermenters and kegs for transfers. A gas post-QD connection here would make this a little more functional and also double as an easy way to connect an oxygen tank for inline wort aeration. That being said, Ss now has a carb stone NPT fitting that allows you to connect a gas post to their new carb stone. This is good enough for me.
A word from experience, You’ll want to break down the carb stone fitting between batches and soak it in wash to adequately clean it. If you’ve run into infections in the past, this could potentially be the culprit.
Another unavoidable downside to non-insulated fermenters is the inevitable sweating during cold crashing. Crashing a fermenter down to 35 degrees in ambient temps will create condensation on the stainless. Luckily, the neoprene jacket will soak up most, however, I still get some water pooling in the summer months. As mentioned, this has been my experience with all fermenters.
Final Thoughts
Overall, I think this is an absolute steal of a fermenter for $1099. The overall design and build are exactly what I’m looking for in a 7-gallon fermenter. Some additional accessories will drive up the cost a bit more, but you may be able to make do with what you already have on hand. While I haven’t tested every conical out there, I’ve had quite a bit of experience with the most popular brands. The Ss Unitank 2.0 is right up there at the top of my list.
I plan on parting ways with one of my current fermenters and buying a second one of these for consistency. While I love my other fermenter, this one is simply more functional and checks all of the boxes. The performance, footprint, and ease of use make it a highly attractive fermenter with a killer value. I highly recommend it!


I appreciate your review of the Unitank 2.0. I have got one batch done in the 17 gal. version. I have some thoughts to share. Note that I am a retired professional brewer with decades of experience.
Overall, it is awesome to have a cylindro-conical fermentor that is able to handle up to 30 psi. Never force carbonate a beer again with that kind of pressure rating! The optional chilling system brings professional-level temperature control to the hobbyist. It is a very slick setup.
That said, there is room for improvement (like most things in life):
1. The quality of the steel is typical of Chinese tanks, meaning it’s not the best. 300 series stainless steel should be austenitic, meaning it won’t attract a magnet. The welds on my Uni 2.0 hold magnets quite strongly; this is not the case with high-quality tanks but is common even on commercial level tanks made in Asia. I’ve never seen this happen on a US or European vessel. Time will tell if it holds up to years of use like it should.
2. The chilling jacket is too low on the tank. If you fill it to its nominal capacity (17 gal), there will be a few inches of liquid above the cooling zone. Heat rises. There is no reason for the liquid above the cooling zone to get cold on a reasonable timescale. Even when the liquid drops below 4C and starts becoming less dense, it will not be less dense than the much warmer layer at the top. Fermenting yeast at the top will get quite warm and stay that way.
I’m typically doing 12 gallon fills, so my wort/beer is in the zone. I would be hesitant to fill this tank above the cooling jacket so that might be a deal breaker for you.
As far as the cone not being jacketed: given how much more the tank would cost if it were jacketed, it’s OK to skip it on such a small vessel. Yeast is a good insulator, so it won’t get as cold as you might think in the cone, but you should be pretty aggressive about dumping yeast so there shouldn’t be much in the cone, anyway.
3. The neoprene insulation isn’t thick enough nor is it sealed against humidity. Once the beer is chilled about 20F below ambient temperature, the chiller runs very frequently. There is condensation on and under the neoprene. I will add extra insulation for the next batch in an effort to extend the life of the chiller.
4. The silicon racking arm is a weird solution to a problem that shouldn’t exist. Commercial racking arms are entirely stainless steel and use use a regular DIN or TC gasket. The best ones are DIN instead of Tri-clamp; DIN is harder to remove unintentionally and therefore desirable for racking arms.
5. The 1″ blow-off pipe is poorly placed, to the point that it is more a danger than a help because it is very difficult to clean. Normally, the blow-off pipe on a well-designed tank gets attached to the center of the dome so that it is part of the CIP loop, taking liquid to the sprayball. On this tank, it’s off to the side, so it won’t be in a CIP loop.
I have found that removing the pipe and just using a piece of silicone tubing attached to a barb attached to a valve on an off-center port works fine for blow off but a more elegant design would have the PRV on a 1.5″ TC off-center or on the blow-off pipe and the blow-off pipe would go to the center of the dome with the ability to attach to a sprayball.
6. I can’t figure out why they would include a stainless ball valve instead of a butterfly valve for the blow-off pipe. Ball valves are both expensive and virtually impossible to clean to sanitary standards. Butterfly valves can be expensive (nice German ones are ~$400 each) but the Chinese-made ones included with the tank seem to be good enough for light use and are very cheap, so why not just include a butterfly?
7. With the ability to handle 30 psi, I don’t see why anyone would want the infection risk of a carb stone in their fermentor. I haven’t used it, I’d rather see the money spent on the carb stone put into a bigger cooling jacket or thicker insulation. Cap that port and just let your yeast carbonate the beer.
I hope this additional info helps in your decision making.